Find the best mountain bikes around $/£500. Be warned: all of these great value bikes will hook you into a new sport and a whole new way of life!
The very best mountain bikes at around £500 always remind us that there’s nothing that should stop you getting out on the trails on a budget. This guide covers only the bikes that have been tried and tested by us and we’re happy to put our name against, which is why a few of them are now just above the £/$500 threshold. You can save this back, and more, by taking advantage of the Cycle to Work scheme, though.

Voodoo’s Braag is a cracking entry level mountain bike
1. Voodoo Braag
Best MTB for around £500
Wheel size: 29in | Frame sizes: S, M, L, XL | Weight: 14.6kg | Suspension travel: 120mm front | Rating: N/A
Reasons to buy:
- Amazing price
- Great geometry and range of sizes,
- Single-ring drivetrain is simple and secure on rough terrain
Reasons to avoid:
- The fork tops out with a clunk.
- It’s just above our £500 threshold
- Only available in the UK
Using the same frame as the multi award-winning Bizango, the Voodoo Braag saves money in a few areas to bring the price point under £600. But while some parts change, you still get the same confident, fun handling and ample spread of sizes.
Other key points are the single-ring drivetrain that’s simple, light, and secure on rough descents. To keep the ride smooth and comfortable, there’s a plush coil-sprung suspension fork and large 29in wheels. The only fly in the ointment is that the fork can get a bit clunky, but overall this is an outstanding bike for the money and one you can upgrade as your skills progress. Yes, it is above our £500 target price, but take advantage of the Cycle to Work scheme and you can spread the cost and save tax, reducing the price by up to 40% if you’re a high rate taxpayer.
Read our full review of the Voodoo Braag

The Calibre Rake has a dialled alloy frame.
1. Calibre Rake
Sorted hardtail for under £600
Wheel size: 29in or 27.5in | Frame sizes: S, M, L, XL | Weight: N/A | Suspension travel: 100mm front | Rating: 8/10
Reasons to buy:
- Good modern frame geometry
- Effective suspension fork
- Sorted tyres and brakes
Reasons to avoid:
- Double chainset and front mech means chain will fall off on descents
- Only available in the UK
Calibre has built the Rake around a quality frame, with modern geometry that will increase confidence and control off-road. The relaxed head angle helps keep the steering stable, the steep seat angle puts you in an efficient position for climbing, and the big 29in wheels roll fast over bumpy terrain – we’d recommend these over the smaller 27.5in wheels unless you’re under 5ft 7in. Lots of solid components ensure the Rake will ride great out-of-the-box, while there are loads of opportunities for upgrading as you get the MTB bug.
Read our full test review of the Calibre Rake

For less than £500 we’d recommend the Carrera Vulcan, but if you can stretch your cash, the Voodoo Braag is leagues better.
3. Carrera Vulcan
Decent entry-level MTB
Wheel size: 27.5in | Frame sizes: S, M, L, XL | Weight: 15kg | Suspension travel: 120mm front | Rating: 9/10
Reasons to buy:
- 120mm travel suspension fork from Suntour
- Decent alloy frame
Reasons to avoid:
- Handlebar is narrow and quirky
- Frame geometry is dated
- 2×9 drivetrain is heavier and more prone to issues than a single-ring system
The Carrera Vulcan is a very popular entry-level mountain bike often seen cruising on the back wheel around your local streets with a hooded yoot aboard. But while most Vulcans might never leave the tarmac, it’s actually a decent bike for getting out onto the trails if your budget is hard-set at £500. For that price you get an alloy frame, 120mm travel suspension fork, 27.5in wheels, and low-maintenance hydraulic disc brakes. Leading the charge is a Suntour XCM fork with 120mm travel giving you more confidence and control in rough terrain. That might not sound like much but it makes a huge difference to the ride comfort of the Vulcan, it covers the ground smoothly and with less chatter and vibration.
Read our full test review of the Carrera Vulcan
What to look for in the best hardtail mountain bike under £500
What is a hardtail mountain bike?
A hardtail is a mountain bike that has suspension at the front (a suspension fork) but has a rigid un-suspended main frame and rear wheel. The term hardtail differentiates it from full suspension bikes – with suspension at both wheels – as well as fully rigid bikes – which have rigid forks as well as rigid main frames.

Ripping on the Carrera Fury.
What size frame should I buy?
Bike manufacturers use seat tube length to denote frame sizes. These can be in inches, or use descriptive terms like Small, Medium and Large. The problem is, there’s no standardised sizing tool, so one brand’s medium can be the same as another’s large.
Mountain biking is a dynamic sport, and you’ll be moving around the bike a lot when you’re riding. It follows, then, that you want plenty of clearance over the top tube when you’re standing astride the bike (called ‘standover’ height, and around three inches is a good starting point) but enough length between the seat and the handlebars that you don’t feel too cramped when sitting down and climbing.
Most brands will provide an online size guide, that will give you a recommended size based on your height. But be careful with these online size calculators as they’re not always that accurate. If in doubt, we’d recommend you go for the largest size you can get away with that still provides adequate standover clearance.
Read our guide: What mountain bike frame size should I ride?
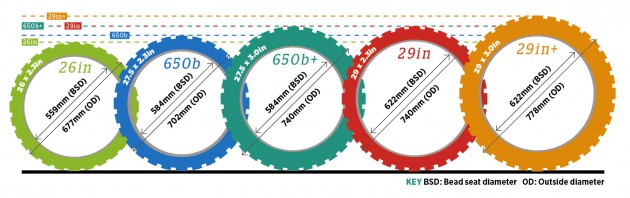
wheel size comparison chart
What’s the best wheel size for a hardtail?
There are two main sizes of wheel on the market. They are 29in and 27.5in. So what are the pros and cons of each?
27.5in – Doesn’t roll as fast as 29in, but easier to turn and accelerate. Generally stronger and lighter than big wheels too. Paired with big volume tyres (2.5in and upwards) you get a more comfortable ride and improved grip.
29in – Rolls fast, more stable at speed and less interrupted by bumps, which makes them great on a hardtail, so long as the geometry is right. Wheels can be weaker and heavier though.
What are the best components – like forks, brakes and tyres – for a hardtail?
At the cheaper end of the market, try and choose a bike with an air-sprung fork. This will let you set adjust it to suit your body weight. Also try and get a fork with adjustable rebound damping at the minimum.
Disc brakes should be hydraulic, with replaceable brake pads. Some disc rotors only work with organic pad compounds, which wear quickly in the wet. A better option is to get a system that accepts sintered metal pads, as these are more durable.
While most new bikes come with inner tubes inside the tyres, a simple upgrade is to go tubeless, using liquid sealant inside the tyre to seal the air and even fix minor punctures without getting your hands dirty. So look for tubeless-ready tyres and wheels, to make the switch easier.
Don’t worry too much about things like grips and saddles, as these can be changed relatively cheaply at a later date to suit your personal preference.

Voodoo has earned full bragging rights for its hard-charging Braag hardtail.
How do I get my new hardtail mountain bike set-up?
1. Inflate your tyres
Ignore the recommended tyre pressures printed on the sidewalls and aim for around 28psi front and 30psi rear – adjusting either way by a few psi if you weigh more or less than 75kg. Wide tyres can be run slightly softer than narrower ones, too – as low as 15psi for a 2.8in model.
Either way, too hard and they’ll be harsh and offer little grip; too soft and you’ll be more prone to pinch flats and you may even roll the tyre clean off the rim.
2. Adjust your handlebar controls
Disc brakes are so powerful you should only need to use one finger to slow down. Loosen the clamps and slide the levers away from the grips until your index finger rests right at the end of the lever blade. This gives you the most leverage and the most secure grip on the bars. Now slide your shifters against the brake clamps to make them accessible.
Your brake levers should be angled in line with your arms as they’re positions when you ride; don’t rotate them to point straight down.
3. Set your saddle position
Firstly, it’s critical you get the saddle height sorted for seated pedalling. As a rule of thumb, your leg should be straight, with your heel on the pedal and the crankarm in line with your extended leg. This allows for a slight bend in the knee when you place the ball of your foot on the pedal at your maximum saddle height.
For technical singletrack climbs, drop your saddle by 1-2cm to make balancing on the bike much easier. Slam the saddle all the way down for descending, and for the next step; setting your suspension…
4. Set-up your suspension fork
Don’t get distracted by handlebar lockouts as they aren’t much use off-road. Instead, focus on setting your sag correctly.
With an air-sprung fork start by using the recommendations printed on the leg. RockShox and Manitou have them, but not Suntour. You’ll need a shock pump to do this. If it has a lock out, check it’s in the open position first.
Now hop on the bike, lean against a wall and adopt the neutral riding position — out of the saddle with arms and legs bent. Bounce up and down on the fork and let it settle to the sagged position. The sag is how much the suspension compresses under your weight. Start with 20 to 25 per cent of the fork’s travel, so if you fork has 100mm of travel, it should compress by 20-25mm. Use the rubber O-ring or a zip tie on the leg to measure this. Be sure to set the sag in your full riding kit, with backpack and water included.
5. Set your handlebar height
Finally, adjust your stem height. Raising your stem will give you more confidence on the descents, by making it much easier to shift your weight rearward. Too high, however, and you won’t have enough weight on the front tyre for grip on flat corners. It’s worth noting that stem height is closely related to fork set-up, as a combination of both will determine the height of the handlebar.