Don't get deflated
Some dos and donts and hints and tips about setting up tubeless tyres.
This guide covers such stuff like: things you can do to get your tyre to seal properly when first setting up, why wetting the tyre bead is a good idea, reasons for removing the valve core, the benefits of tubeless inflators, when to replace old sealant, how to deal with tubeless troubles on the trail.
Things you may need
- Tubeless wheel (or tubeless-converted wheel)
- Tubeless tyre
- Tyre sealant
- Sealant injector
- Valve core removal tool
- Track pump
- Tubeless inflator
- CO2 canister
- CO2 inflator
The basics of tubeless
Apologies if we go back to basics here. Some of you will know a lot of this initial explanation of what tubeless is, so bear with us while we illuminate things for those who still need the fundamentals explaining better.
Are your wheels tubeless?
Not all wheels are tubeless. In fact, the majority of them won’t be.
For a wheel to be able to be run tubeless it needs to have something inside the rim that prevents air escaping through the spoke holes.
On tubeless specific wheels this sometimes means a sealed rim bed where the rim is covered up by rim metal. On other tubeless wheels a tight-fitting band around the rim covers the holes.
If your wheels are not tubeless, don’t worry, you can convert them into tubeless wheels with one of the many tubeless conversion kits available from companies like Stans No Tubes. These typically compromise of some special airtight rim tape and/or a rubber strip that goes over the spoke holes, some tyre sealant and a valve (either on its own or built into the aforementioned rubber strip).
Are your tyres tubeless?
Not all tyres are tubeless. Having said that, the majority of recently released tyres will be tubeless. Look on the sidewall of your tyre(s) for a telltale phrase ie. Tubeless, Tubeless Ready, TLE, TLR, TCS, 2Bliss and do a bit of Googling if you’re unsure what your tyre’s acronyms actually mean.
Tubeless tyres are different to standard non-tubeless tyres in that the carcass is airtight. If you try to run non-tubeless tyres as tubeless then the air will just slowly leak out of the carcass. Tubeless tyres have a fully sealed interior.
What does the sealant do?

It stops air leaking out of things. In the very early days of tubeless some systems (early UST) tried to do without sealant but they nigh on impossible to setup and weren’t very reliable on the trail either.
You need sealant. It’s what stops air leaking under the tyre bead or through the rim tape and spoke holes.
Sealant works a lot like the blood in your body. It stays liquid up until a hole is encountered at which point the blood/sealant rushes to the holes, coagulates, clots up and scabs over the hole. No more leaking.
Getting your tyre on and inflated

Putting a tubeless tyre on to a wheel is the same as putting a standard non-tubeless tyre on to a wheel. But there are a couple of things you can do to make the next step (tyre inflation) a bit easier and more reliable.
Getting a tubeless tyre to inflate is The Main Problem with setting up tubeless. It’s the only thing that makes the process different to a non-tubeless tyre setup.
Inflation problems can be maddening. They can lead to you giving up the whole tubeless idea and just bunging an inner tube in!
We’re here to help. Preparation and having the right equipment is key.
Method 1: Track pump
You can’t setup tubeless with a mini-pump. Don’t even bother trying. You need a decent track pump.
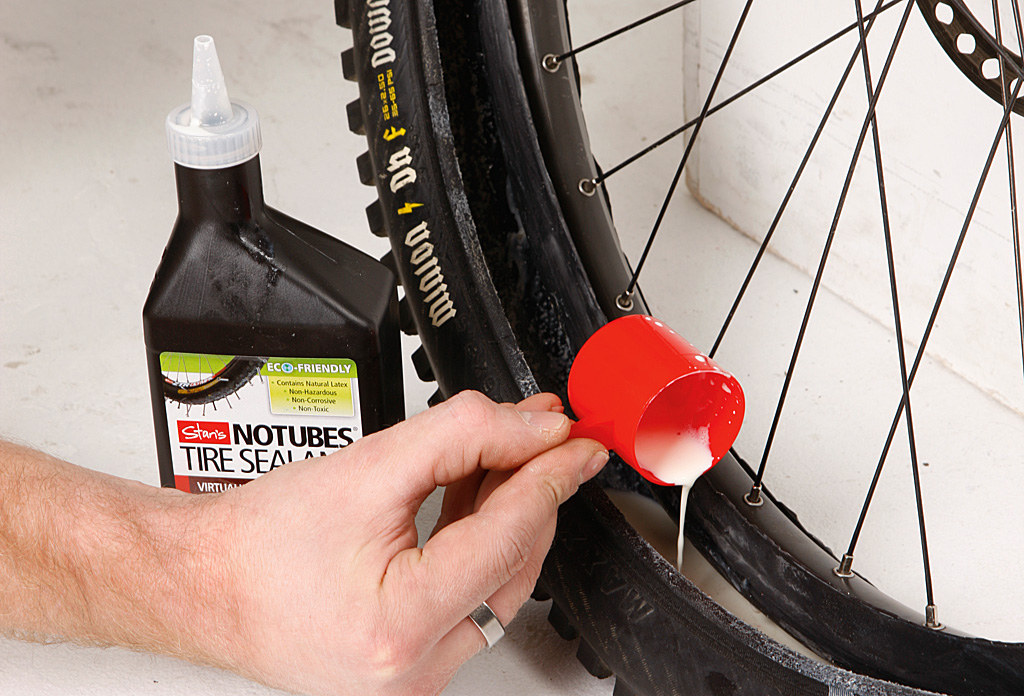
Put your tubeless tyre almost fully on to the wheel but leave a gap where you can pour some sealant in (the sealant bottle will tell you how much to use), pour in the sealant, pop both tyre beads fully on to the wheel.
If you’re feeling lucky, simply attach your track pump and pump as fast as you can. If the tyre inflates and stays inflated – hurray! You’re all done. Well, you might just want to ‘hula-hoop’ the wheel around a bit in the air to make sure the sealant gets a go at coating the whole inside of the tyre and rim.
If you’re not feeling so lucky, then a great tip is get some sealant (or some Fairy Liquid bubbles) and generously lube around the tyre bead/wheel rim interface. This ‘wall of lube’ will help prevent air leaking out during inflation. Once lubed up, attach your track pump and pump as fast as you can. Hopefully the tyre will inflate and stay inflated.
Method 2: Tubeless inflator
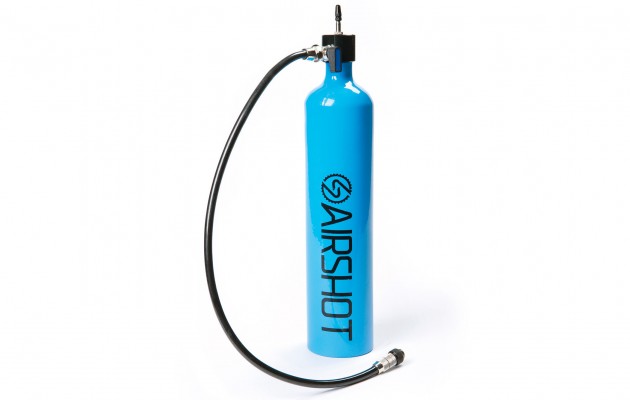
A tubeless inflator is a very handy thing to have. A tubeless inflator is a pressurised container which you can inflate to high pressure with your track pump. Once its up to pressure you connect it to your wheel’s valve and dump a whole load of air really quickly into the tyre. The speed and volume of the air rushing in gets things seated and sealed in a few seconds.
If you have a tubeless inflator then you’re laughing. Simply put some sealant in your tyre (the sealant bottle will tell you how much to use), pop both tyre beads fully on to the wheel and then get busy with your inflator.
Things to try if your tyre still isn’t inflating
Try the tip above (in ‘Method 1: Track pump’) about lubing up the tyre bead.
If that doesn’t work, remove the valve core from the valve and re-attempt inflation as before. Simply removing the core will improve the speed and volume of air allowed to pass through the valve into the tyre. Tubeless inflation is all about getting as much air in the tyre as possible in the quickest amount of time. Once you remove the track pump or tubeless inflator all the air will rush out. Don’t worry. The idea here is to just get the tyre beads seated and sealed properly. Re-install the valve core and re-attempt inflation.
If that still doesn’t work, put an inner tube in. Don’t worry, we don’t mean put an inner tube in and forget all about going tubeless.
Pour out the sealant from your troublesome tyre (it’s reusable so don’t throw it away). Remove the valve (or rubber strip with built-in valve). Put an inner tube in, seat the tyre beads fully on the wheel, just like a normal tyre, and pump the tyre up. Pump it up hard to around 60psi.
Hopefully during this inflation you’ll hear some pinging noises and the tyre beads snap into place properly against the wheel rim walls. If you don’t hear any pinging, don’t worry and don’t go over 60psi. Then let all the air out. The idea here is that you’ve seated the tyre beads properly into the rim walls thus making a decent seal.
Remove the inner tube. Yes you do then have to undo one of these beads when you remove the inner tube. But at least the other bead of the tyre is still seated.
Re-install the valve (or rubber strip with built-in valve) and re-attempt inflation.
If all that STILL doesn’t work, something is wrong. Check your rim strip for misalignment. Check your rim walls for dents or damage. Check your tyres for cuts or bead deformity.
Two more things to do once inflated
Don’t forget to spin your wheel around and also laterally ‘hula hoop’ it in the air to get the sealant inside to coat everywhere it needs to inside the tyre and rim.
And we always recommend inflating your tyres initially to around 60psi and then leaving them for at least half an hour or so before going back to them to see if they’ve held pressure or have deflated slightly. If they have deflated a bit, don’t worry, that’s fairly normal. You don’t have to start everything from scratch. Simply top up the pressure again with your track pump, then spin and ‘hula hoop’ the wheel around and leave it for another half hour before checking it again.
>>> How to set your tyre pressures
Don’t forget to reduce the tyre pressure before going on a ride. 60psi is not fun on the trail! A ballpark figure to aim for is 25-30psi but it depends on the tyre size and your body weight etc. One of the main benefits of going tubeless in the first place is to be able to run lower pressures without pinch flatting so don’t be afraid of experimenting with lower pressures than before.
Living with tubeless
Don’t worry, running tubeless tyres is pretty much exactly the same as living with standard non-tubeless tyres.
All tyres should be checked for pressure before every ride; tubeless and non-tubeless tyres do leak air over the course of a couple of weeks or so. So give ’em a squeeze before every ride and double-check your psi pressures with your track pump if you think they may have lost pressure a bit.
The main thing to bear in mind with tubeless is that you will have to replace and/or top up your sealant every few months or so. Sealant dries out. Sealant leaks out when it’s repairing punctures/tears.
This need-to-remember maintenance is only really an issue if you run the same tyres all year round. You’ll have to remember to check your sealant levels every six months or so.
If you change tyres throughout the year – even if it’s just swapping from summer tyres to winter tyres – you don’t need to try to remember to check your sealant because you’ll see how much functioning sealant you still have in your tyres when you go to change your tyres.
After a long time with tubeless you might find that your tyres aren’t inflating as easily as they used to. This is usually caused by dried-up sealant clogging up the valve. Either replace the valve with a brand new one or take the valve apart and scrape out dried sealant with a pin or similar.