 Even among the most seasoned of cyclists, wheel truing is often seen as a black art, never to be attempted for fear of being burnt at the stake, or worse: ruining your bike. Truth be told, it’s a very straightforward process when broken down into its component parts. The drawbacks are often born out of frustration. For the less experienced, it’s very slow going with seemingly miniscule adjustments, followed by a check then repeating to fade.
If you’re the type of mechanic who gets annoyed at how fiddly changing brake pads or gear cables can be, or regularly rounds off bolts, then it’s probably best you avoid the spoke key. To work on wheels you must accept that you need a minimum level of ‘mechanical sympathy’, as it’s quite simple to ruin everything.
Another reason why the mtb’er should love the disc brake is the reduced need for perfectly-straight wheels —with V-brakes small buckles in the wheel mean brake rub. Still, a well-tensioned wheel rides much better, and a badly bent wheel will make itself felt when riding, but discs have reduced the need for trailside spoke key action.

TOOLS FOR THE JOB:
Spoke key to fit your nipples. Nipples are generally square, but come in various sizes. The correct size spoke key is the smallest one that will fit on your nipple, even if it’s a tight fit that is slow to put on. Ensure the spoke key is fully engaged as a badly fitted or loose key can damage the nipple.

SPECIAL NEEDS:
Some wheels, such as Mavic’s Crossmax, need a special tool. It has splines that mate to those on the larger diameter aluminium nipple.

MAKESHIFT JIG:
With an elastic band, or zip-tie, attach an Allen key — or pen
LATERAL PLAY (side to side wobble):
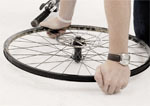
1 Flip the bike upside down and spin the wheel. You will see the wheel moving closer to one side (possibly both) of the frame or forks. If you have rim brakes, you can use these to gauge the severity. If not you may need to fashion a device, such as shown in the top tip.

2 When you find the most badly bent area, you need to shorten spokes opposite it. This requires the addition of tension. You can experiment first, by grabbing a handful of spokes on the opposite side to the bend, and squeezing them together (adding tension). You’ll see the rim pulling away from the gauge. With the spoke key attached to the spoke at the centre of the bend, turn the nipple anti clockwise half a turn, then check again. Adjacent spokes on the opposing side from the bend may also need attention if the bend is bad.

3 Generally you work with a group of about four or five spokes at the site of the bend, shortening a few and lengthening some others. Once you have had to add three half turns to any spoke opposite the bend, then you will have to loosen the spoke on the side of the bend, turning the nipple half a turn clockwise. With a bad bend, you may need to work on an even larger group of spokes. This shares the load of pulling the bend out over a larger area, reducing the likelihood of overtightening any single spoke.

4 Repeat the process until the wheel gradually pulls straighter, spinning the wheel to find each small bend. Once almost straight, you may need to move onto quarter turns of the spoke key. The process can be almost addictive. Must.. get… straighter… one… last…. spoke…
RADIAL PLAY (up and down wobble):
1 Remove the tyre and tube. And set up the jig (or your makeshift gauge) under the outside edge of the rim at its highest ‘jump’.

2 Tighten pairs of spokes under the high spot by turning each pair of nipples anti clockwise.

3 Spin the wheel and check again.

4 Repeat the process until all the high spots have been eliminated. For any low points, reduce tension in the pairs of spokes by turning nipples clockwise.
RETENSIONING:
Sometimes, after hard use, wheels can lose all their tension. The wheel can still be fairly straight, but all the spokes are loose. This makes for a very weak wheel. A wheel jig makes this job much simpler.
1 Note overall spoke pattern, and find the spoke next to the valve hole. Add half a turn to this and every other fourth spoke. When you get round again, move onto the next spoke on the same side. Repeat. Then add tension to the first spoke on the other side of the wheel, and each subsequent fourth spoke. Move onto the fourth set of spokes and repeat.

2 Remove the wheel (from the jig or bike) and de-stress the spokes. With the hub axle on the floor, place your hands directly opposite each other on the rim, and gently lean on the rim. If there is still low tension in the wheel go easy at this stage, as it is easy to bend an unsupported rim. Spin the wheel an eighth of a turn and press down again. Repeat until you have gone round the wheel. Turn the wheel over and repeat the whole process.

3 Now stick the wheel in the jig and do it all over again. You must do the process in small stages, to prevent rim distortion. As spoke tension increases, when you lean on the rim you will hear pops and tings — this is the spokes seating themselves correctly.
Compare the tension of your wheel with a good wheel, and stop when they seem similar. Always err on the side of caution. In the less experienced hands, too little tension is always better than too much.
KNOW WHEN TO GIVE UP:
It’s also worth remembering that a straight wheel can be weak, if the tension is not even. This can be the case if you’ve straightened a badly bent wheel. Before repair, if a wheel bends right but the spokes on the right are already loose, and the left side tight, the rim itself is bent. Tightening the left spokes to pull the bend out isn’t possible, so you may be tempted to loosen the right side further. While this may make the wheel straight, uneven tension can make the wheel prone to collapse. You need to know when to accept defeat. This requires the ability to assess tension. It is not a black and white, ‘now it’s fixed’ type of maintenance. It’s a feeling that generally comes with practice, and lots of it!