Plus where to buy it and where to ride it
Riders ready! Expert advice on where to buy, how to set-up and where to ride your new hardtail.
>>> Hardtail of the Year: best mountain bike under £500, £750 and £1000
You’ve read the reviews, studied the specs and feel ready to hand over your hard-earned cash on the new bike of your dreams. But do you buy online, walk into a shop or click and collect? How do you choose the right frame size? How do you set up your suspension? What about tyre pressures and saddle height? And where are the best places to ride it?
The answers to all these questions and more can be found on these two pages. Swot up now and you’ll ride off on the right foot.

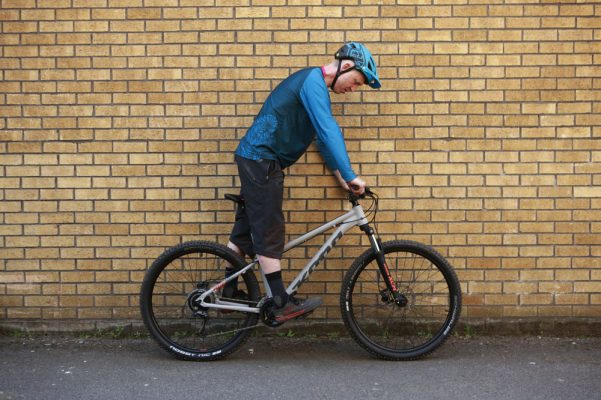
Pic: Sandy Plenty / Ruben Plenty
Where to buy?
Shop
Good bike shops will hold your hand throughout the process and offer all the advice and after-sales support you need if anything goes wrong. Try and choose a mountain bike specialist; one with passionate staff that ride regularly. Often these shops are situated close to the best riding spots.
Go armed with a shortlist of models, and try and visit during the week, when it’s quieter, if you want to really pick the brains of the staff.
Ask to test ride the bikes if you can (take ID just in case).
If you decide to buy, don’t be afraid to ask if you can substitute things like tyres and stems – a good shop may just charge you the difference in price.
Usually a shop will give you a first free service, too, after a few weeks. This will include checking the gears and brakes once they’ve bedded-in, and lubing the chain. It’s also a good opportunity to ask any questions you have about set-up.

Online
Find out how much delivery costs – it’s free from Vitus and Sonder, but some brands, such as Canyon, charge.
Be sure to read the terms and conditions before you buy. These will spell out what happens if you buy the wrong size, or something is faulty on the bike. Expect to pay the cost of shipping the bike back to the manufacturer if anything goes wrong – check the FAQs.
Decide whether you are confident enough to assemble the bike yourself. It’s not complicated, but you’ll need basic tools and mechanical competence. If not, a good bike shop will do it for you, but expect to pay around £50 for this job.
You probably won’t be able to see the bike in the flesh, let alone sit on it or test ride it, so triple-check what size you need. Email the brand to check, or search forums for any owner recommendations. When it arrives, ask yourself does the cockpit feel roomy enough? Is the standover height good enough to lean the bike over in a corner? Is the seatpost and saddle in the right place? If the worst comes to the worst, you can usually send it back, unused, for a different size, but check this is the case. For reference, all of our test riders are 5ft10in-5ft11in, and we’ve listed the frame size tested in the spec panel.
When the bike arrives, make sure the box looks undamaged.
How to choose the right size
Bike manufacturers use seat tube length to denote frame sizes. These can be in inches, or use descriptive terms like Small, Medium and Large. The problem is, there’s no standardised sizing tool, so one brand’s medium can be the same as another’s large.
Mountain biking is a dynamic sport, and you’ll be moving around the bike a lot when you’re riding. It follows, then, that you want plenty of clearance over the top tube when you’re standing astride the bike (called ‘standover’ height, and around three inches is a good starting point) but enough length between the seat and the handlebars that you don’t feel too cramped when sitting down and climbing.
Be careful with online size calculators. They’re not always that accurate. If in doubt, we’d recommend you go for the largest size you can get away with that still provides adequate standover clearance.
Get set to ride
Inflate your tyres
Ignore the recommended pressures printed on the sidewalls and aim for around 28psi front and 30psi rear – adjusting either way by a few psi if you weigh more or less than 75kg. Wide tyres can be run slightly softer than narrower ones, too – as low as 15psi for a 2.8in model. Either way, too hard and they’ll be harsh and offer little grip; too soft and you’ll be more prone to pinch flats and you may even roll the tyre clean off the rim.
Adjust your controls
Disc brakes are so powerful you should only need to use one finger to slow down. Loosen the clamps and slide the levers away from the grips until your index finger rests right at the end of the lever blade. This gives you the most leverage and the most secure grip on the bars. Now slide your shifters against the brake clamps to make them accessible. Your brake levers should be angled in line with your arms – don’t rotate them to point straight down.
Optimise your riding position
Firstly, it’s critical you get the saddle height sorted for seated pedalling. As a rule of thumb, your leg should be straight, with your heel on the pedal and the crankarm in line with your extended leg. This allows for a slight bend in the knee when you place the ball of your foot on the pedal at your maximum saddle height. For technical singletrack climbs, drop your saddle by 1-2cm to make balancing on the bike much easier. Slam the saddle all the way down for descending, and for the next step; setting your suspension…
Set-up your suspension fork
Don’t get distracted by handlebar lockouts as they aren’t much use off-road. Instead, focus on setting your sag correctly. With an air-sprung suspension fork – common above £600 and found on all the winning bikes – start by using the recommendations printed on the leg. RockShox and Manitou have them, but not Suntour. You’ll need a shock pump to do this (around £20). If it has a lock out, check it’s in the open position first. Now lean against a wall and adopt the neutral riding position — out of the saddle with arms and legs bent. Bounce up and down on the fork and let it settle to the sagged position. The sag is how much the suspension compresses under your weight. Start with 20 to 25 per cent of the fork’s travel — so, if you fork has 100mm of travel, it should compress by 20-25mm. Use the rubber O-ring or a zip tie on the leg to measure this. Be sure to set the sag in your full riding kit, with backpack and water included.
Find the right bar height
Finally, adjust your stem height. Raising your stem will give you more confidence on the descents, by making it much easier to shift your weight rearward. Too high, however, and you won’t have enough weight on the front tyre for grip on flat corners. It’s worth noting that stem height is closely related to fork set-up, as a combination of both will determine the height of the handlebar.
Wheel size
There are three main sizes of wheel on the market. They are 29in, 27.5in and 27.5 Plus wheels. So what are the pros and cons of each?
27.5in
The default wheel size now. Doesn’t roll as fast as 29in, but easy to turn and accelerate. Generally stronger and lighter than big wheels too.
29in
Rolls fast, more stable at speed and less interrupted by bumps, which makes them great on a hardtail, so long as the geometry is right. Wheels can be weaker and heavier though.
27.5 Plus
Uses wide 27.5in rims (30-40mm) mated to 2.6in to 3in wide tyres. Can be run at super low pressures (less than 15psi) to give better grip and more comfort. But they’re often heavier, usually more expensive, and very sensitive to pressure. Increasing in popularity and we’d definitely consider them as they really improve the riding experience on a hardtail.
Where to ride
Here’s our pick of the best hardtail-friendly trails, where the surface is smooth and speed comes easily.
Glentress
Try the Blue trail – it’s great for new riders and hardtails alike, but even the experienced will find fun by getting creative.
Swinley Forest
Easy to get to from the Big Smoke, rolling hills and twisting trails make Swinley Forest the perfect urban escape.
Cannock Chase
The Swinley of the Midlands, both the trails here are hardtail-friendly and the Cannock Chase centre is easily accessed from the M6 motorway.
Forest of Dean
Loads to explore here, with the Verderers trail making an excellent starting point.
BikePark Wales
Fast and furious is the order of the day on BikePark Wales‘ blue trails. Sixtapod, Willy Waver and Terry’s Belly should be on your must-ride list.
Afan
Check out the Blue Scar trail for a smooth, roller-coaster ride.
Wind Hill
Smooth, grin-inducing trails where you least expect them; Longleat Safari Park in the heart of Wiltshire.