No doubt that's cursed it

Dare you ditch the mud spikes? Is it time to switch to your lighter weight gloves? The ceremonial de-winterising of your bike is highlight of the year.
Half term school holidays have been and gone. Whether you have kids or not, you should always make February half-term on your calendar. Why? Because more often than not, it marks the time when it’s safe(ish) to de-winterise your bike.
Depending on how diligent you’ve been over winter with your cleaning and maintenance, you’ll need to make various changes to your bike’s current guise to get it more suited for warmer and firmer conditions.
As regards maintenance and servicing, there’s a full rundown further down this webpage. For now, we’re going to concentrate on what components and accessories to swap out.

Switch tyres
At the very least, it’s time for those narrower spikier tyres to come off. It’s time to put your bigger and faster-rolling rubbers on. Refresh your sealant while you’re there.
If you want to call it a day and get on with your life at this point, fair enough. If you really want to have winter-summer yin-yang specific bike setups, then read on…

Suspension tweak
Soften up – and quicken up – your suspension. Throughout winter you may have ended up twiddling with damping dials and shock pressures to try and firm things up to do with un-firm sloppy trails. As the trails firm up, you need to de-stiffen your bouncy bits. Wind off some clicks of both your compression and rebound damping. Double-check your sag.
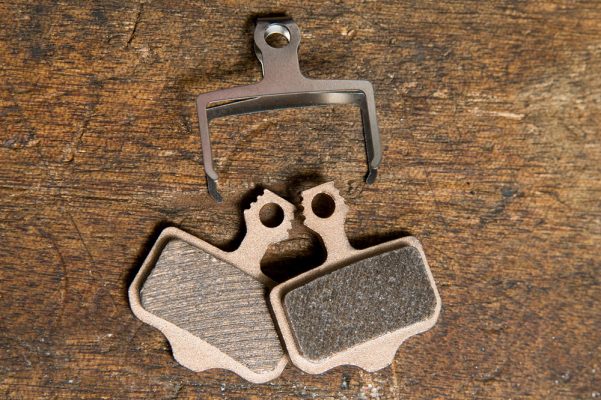
Swap brake pad flavours
Change front brake pads. Not because they’ve worn out (they probably have though) but because you may be running sintered or semi-metallic pads. Stick some organic/resin pads in there for increased power now that the pad-eating puddles are rescinding.
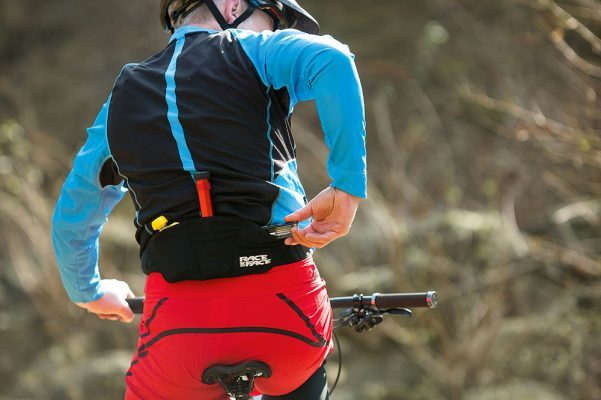
Ditch the backpack
Winter riding involves lots of clothing layers and lots of trailside repairs. Now’s the time to double-down on the freedom that spring affords us and ditch riding with that hefty and restrictive hydration pack. Stick a bottle cage on. Stuff minimal spares in your jersey pockets (or in frame-wrap-strap).
![]()
Find your tinted lenses
The time for clear lenses is over. And while it’s never really full-on shades time in the UK, apart from that one week in July, it is a good idea to wear some tinted orangey/pinky/browny eyewear.
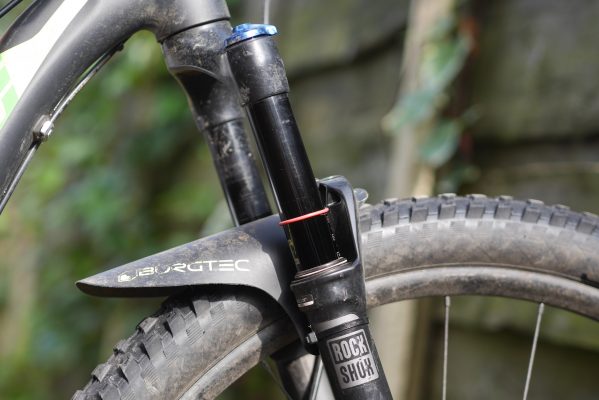
Swap mudguards
No UK rider is without some sort of mudguard all year round. With the advent of the modern minimalist fork-mount fenders it makes sense to run one even during high summer. But if you’ve been using one of the larger Mudhugger-style moto fenders during winter, then now is the time to switch back to a smaller Marsh-guard style affair.
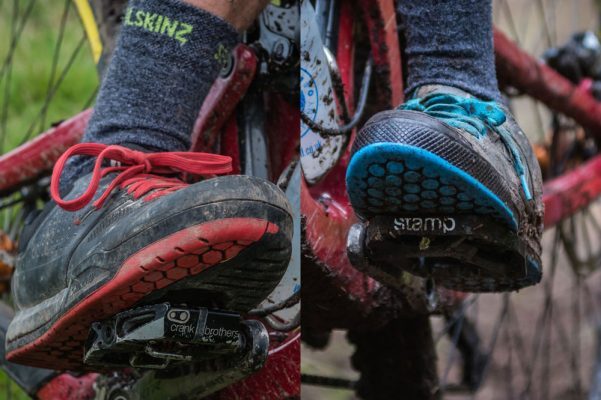
Switch to clipless
This is not for everyone. Heaven knows here at mbr we’re some of the biggest flat pedal preachers out there and most of us ride them all year round. But if you’re one of those riders who ride flats in winter and clip-in for the other seasons, then now’s the time to switch back to clips. Similarly, if you’re clipless-curious, now’s the time to give them a spin.
Right then, that’s the parts swapping over with. Now it’s time for tools and lubes…

Give your bike a spring clean
Warning: inspecting your bike this closely is going to result in some necessary spending on replacement parts. Sorry!
Whether you’ve been riding a lot through the winter, or just left your bike rotting in the garage since September, chances are it will need a spring clean. This step-by-step isn’t merely about washing the dirt off, but rather it’s a full system reboot, that will get your bike performing perfectly in time for the arrival of the spring season.
Tools required
- Allen keys
- Pedal spanner
- Bottom bracket tools
- Grease
- GT85 or WD40
- Chain lube
- Degreaser
- Clean rags
- Pump
- Tyre sealant
We’re not going to insult you by telling you how to clean your bike or bore you with the pros and cons of a jet wash. Each of us has a favourite cleaning regime; just make sure it’s effective and the bike is clean. Once it’s dry, now is the time to give it the once over. This doesn’t mean just making sure the gears work, but checking to see if all the bolts are tight; not covered in grime or rust and are still in place — it’s common for a rotor or chainring bolt to fall out unnoticed.
The follow dozen or so tips cover some of the more common problem areas. You’ll see that we even recommend stripping the headset and bottom bracket and repacking them with fresh grease. Chances are these will be running on sealed cartridge bearings and while there’s nothing much you can do apart from slapping on some grease, it means any service is going to take a few minutes at most. If fact, we think you could carry out all of the tips here in under an hour. This will also give you the opportunity to spot any major problems, like a cracked bar, a broken frame or a sticky bearing. So, follow the tips and your bike will not only work better, but it’ll be safe to ride too.
1 Remove the pedals, clean off any gunk, give the axles a spin to check the state of the bearings. Refit using fresh grease. Check the tightness of all the Allen key bolts and, if you have flat pedals, the surface pins.
2 Clean the saddle clamp/cradle interface. Especially the bolts using a small brush and reinstall with clean grease. Dab a bit onto the bolt heads if they’re looking rusty.
3 Remove the seatpost and lube the shaft and seat clamp bolt. Clean down the inside of the seat tube with a large bottle brush or a rag on the end of a stick.
4 Undo and remove the stem. Remove the bolts and clean the threads. Regrease them, then refit. Inspect both the bar and steerer areas.
5 Dismantle the headset and wipe away any dirt or moisture from the seals. Apply a thin smear of grease to all the contact areas — rub it into the gaps between the seals.
6 Clean any gunk off the fork seals. Trickle a small amount of oil (chain lube will suffice) onto the seal area and compress the fork, wipe of the excess.
7 Remove both wheel axles. Clean off any rust on the rods with some GT85 or similar and apply a thin coat of light grease. Lube the pivot and work the lever backwards and forwards until smooth.
8 A loose chainring or bottom bracket cup can cause the cranks to move out of alignment and result in rogue front shifting. It happens gradually — so periodic checking is essential.
9 Dodgy rear shifting can be caused be a loose derailleur hanger, rear derailleur or cassette lockring. It’s worth checking all three are tight and using Loctite on the former if it comes loose more than once.
10 Loose caliper bolts can result in uneven pad wear. To hold them fast use blue Loctite on the threads or if you have Shimano brakes, thin wire threaded between both fixing bolts.
11 Clean both the rotor and the pads with a dedicated disc brake cleaner or methylated spirits.
12 Check all the rotor bolts are tight, but not too tight. Again use some blue Loctite on the threads and tighten to the recommended torque.
13 Remove your hefty and draggy winter/mud tyres and replace with your ‘summer’ tyres.
While you’re there
Remove the seat collar, dismantle and clean. Lube before refitting. Stops that mystery creaking you couldn’t locate.