SRAM's suspension guru talks you through how to improve the set-up of your RockShox suspension fork, from Lyrik to Pike, to Revelation

Jon Cancellier, the man behind RockShox’s cutting-edge BlackBox race programme, reveals the secrets to an optimum RockShox fork set-up. Although in this instance he was talking about the Pike fork, it also applies to the Lyrik, Revelation, Yari, SiD and others.
>>> Best mountain bike suspension forks 2020
How to achieve perfect RockShox fork set-up

Bottomless Tokens can be used to tune the air spring volume
1. Air volume
A larger volume is easier to bottom-out, a smaller volume will ramp up more towards the end of the stroke.
Air volume is actually really easy to change on RockShox forks (including the Pike Solo Air and Lyrik) by adding or subtracting Bottomless Tokens. (Note: older Dual Position Pike forks don’t have this feature.)
The tokens are housed in the spring leg (left leg as you sit on the bike).
Remove the dust-cap, depress the Schrader valve with a 3mm Allen key, and let all the air out.
Using a 24mm socket on older models, or a cassette removal tool on newer models, unscrew the top-cap assembly from the fork.
Check your fork against the chart below to see if you’re running the correct number of spacers.

“For more aggressive riders, I recommend one or two tokens at 160mm”, explains Cancellier. “For each 10mm decrease in travel, I add one token. For example, 150mm would be two or three tokens, 140mm three or four tokens etc.”
When installing the tokens, ensure you thread them securely into the top-cap and the adjacent token. Were they to come loose, they could jam inside the fork.
Reinstall the top cap to 28Nm.
Top tip: Keep your Pike running sweetly with a lower leg service after approx 50 hours of riding. Watch our step-by-step video guide here.
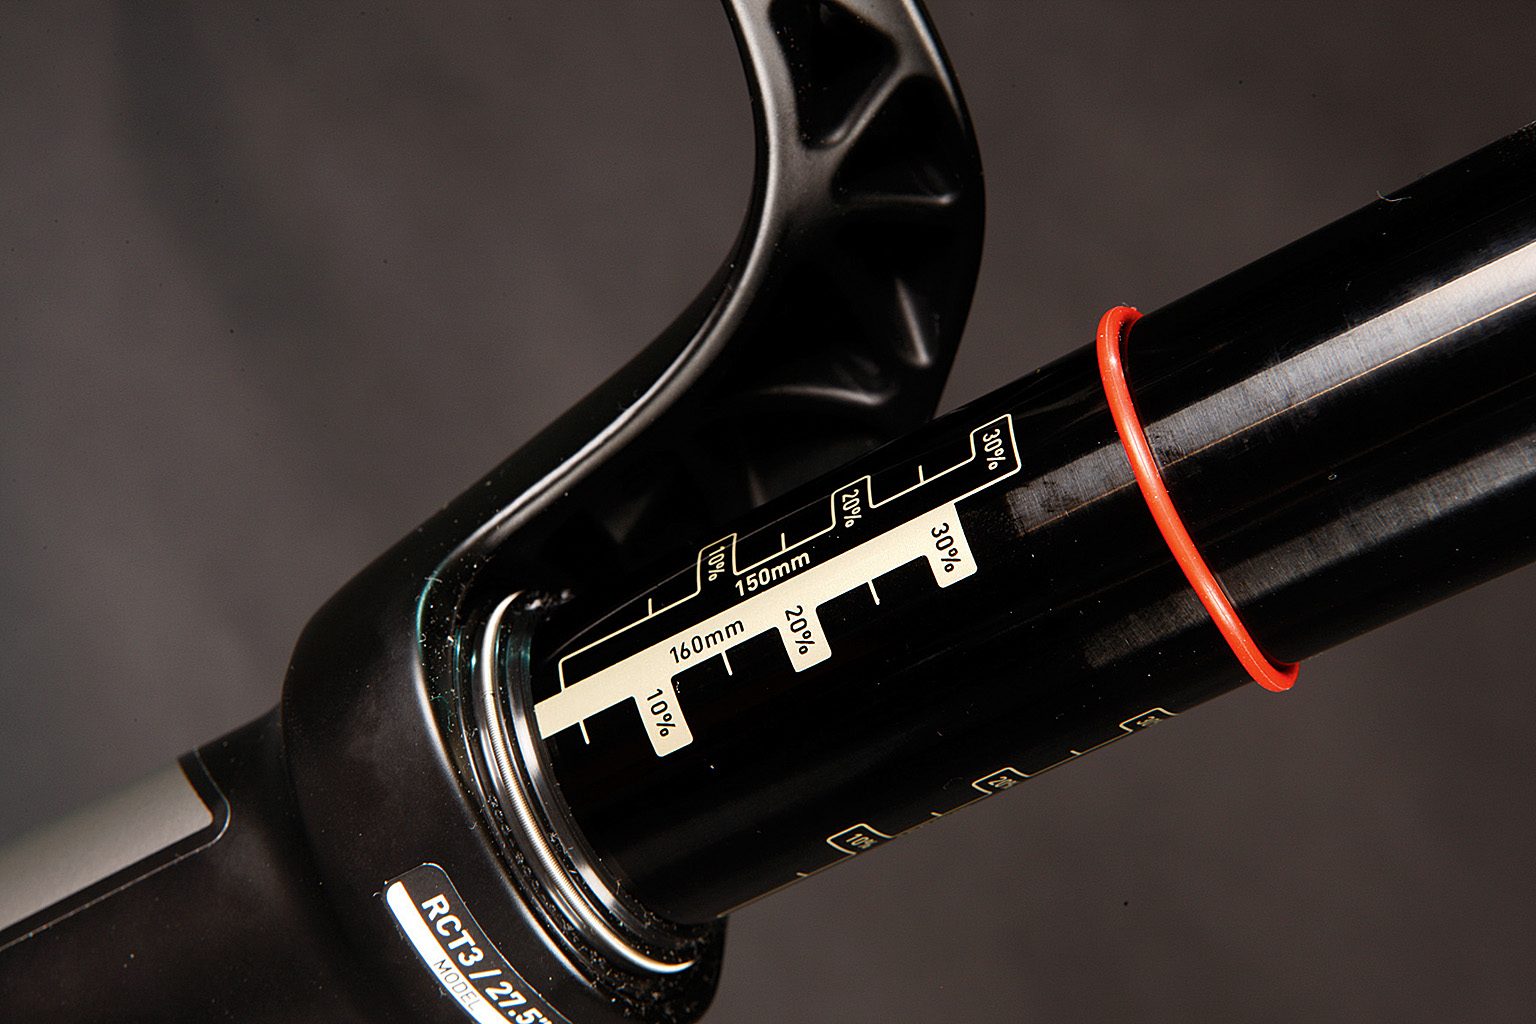
Use the O-ring in conjunction with the markings to set your sag
2. Air pressure
“Now that we have reduced the air volume in the fork by adding Bottomless Tokens, we can run less air pressure for better small-bump absorption but with increased bottoming resistance”, says Cancellier. “I would aim for 5-10psi less depending on how many tokens were added.”
RockShox supplies an air pressure guide printed on the left leg. In the case of the Pike, we’ve found the suggested pressures are a good start point. Combine the recommended pressure with the sag indicator (printed on the right leg) to get the set-up exactly where you want it.

RCT3 models offer low-speed compression adjustment, but only in the open setting
3. Low speed compression
If you have an RCT3 model fork, the low-speed compression is adjusted using the smaller-diameter knob on the top of the right leg.
There will be around 13 clicks of adjustment on offer.
Note: The low-speed adjustment only has an effect when the blue outer dial is in the open position (two o’clock when viewed from in the saddle).
Cancellier says: “Use the low-speed adjuster (black knob on RCT3; main knob on RC) to adjust initial movement in the fork. If you’ve changed the volume and lowered the air pressure, you can increase low-speed compression to let the fork ride higher, but still have it supple over small bumps.”

Rebound is adjusted at the base of the right leg
4. Rebound adjustment
Altering rebound is done using the red knob at the base of the right leg.
There should be around 20 clicks of adjustment. Turning it in the direction of the hare will reduce damping; tortoise to increase.
“This is always a personal adjustment”, says Cancellier, “dependent on your air pressure — rebound is trying to control the force of the air spring returning to full extension.”
Thus, heavier riders running higher air pressures will likely require more rebound damping than lighter riders.
“Also, some riders prefer a slightly faster fork while others a slower one. Whichever you prefer, you should aim to have the fork returning in a controlled manner that isn’t so fast as to return violently, or excessively slow.”
Top tip: If you ride somewhere new, you may have to adjust your settings to suit the terrain. For instance, go somewhere fast and rough, like the Alps, and you may have to run slower rebound damping, or change your air pressure.

Push the lever in and turn to adjust the Maxle tension
5. Maxle tension
The fifth and final tip for RockShox fork setup is about the thru axle. The sleek new Maxle is a more robust unit with a simplified action.
“To get your Maxle set up, thread it all the way in, back it off half a turn and close the lever. Check the lever position and think of it as hands on a clock. We run the Maxle pointing straight back — nine o’clock (number nine on the Maxle).
“If you take the Maxle out and look at the white line and the corresponding number, you can then push the head in and turn the Maxle until you get your desired position.”