 Crank Bros Eggbeater is a great pedal but, like the Shimano SPD pedals we serviced two issues ago, it needs a bit of TLC from time to time. The lightweight design of this pedal means the bearings, although durable and easily serviced with the grease injection device, are small. All Crank Brothers pedals feature a dual-bearing unit with a tiny cartridge-bearing on the outside and a thin Delrin bushing nearest the axle. Both can wear prematurely, especially if you’re a fat knacker and you don’t service the pedals during the two years you’ve owned them — which is the case here.
Replacing both bearings is pretty straightforward but there are a couple of things worth noting. First, the axles can also wear, especially where the bearings seat. Replacement titanium axles for our Triple Ti pedals cost £55 a pair, but there’s currently no official price for the stainless steel versions for the cheaper Eggbeaters. That said, 2Pure, the Crank Bros importer, offers a rebuild service (for £20) and told us it will work out a price for steel axles if they need replacing.
Inside the pedal, underneath the spring, is a thin central sleeve. Again this can wear, but it’s not easy to remove, nor something 2Pure recommends you attempt at home because a special tool is needed to get it back in straight. If you suspect the sleeve is worn — you’ll be able to feel excess play even with new bearings fitted — 2Pure charges about £5-6 for a new one and £8 to fit it. It’s worth mentioning that if the pedals are under two years old, both the axle and sleeve are covered under warranty. Finally, if you’re having problems with premature release, the retention springs could be worn. It’s unlikely, but these can be easily replaced, again call 2Pure for prices.
The following step-by-step pretty much covers all Crank Bros pedals, even Candys and Mallets, and most model years. You’ll need a dedicated ‘rebuild kit’ for your pedals but they can all be ordered from 2Pure, contact them on the number below.
TOOLS FOR THE JOB:

Flat head screwdriver / Grease gun / Eggbeater rebuild kit £12 / Small screwdriver / 8mm socket / 8mm Allen key / Contact: 2Pure 0131 448 2884

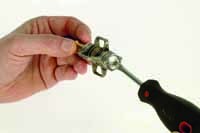
1 With a large flat-headed screwdriver remove the silver dust cap and discard.

2 Underneath you’ll see the 8mm locknut. Hold the axle with an 8mm Allen key and loosen and remove the nut with a 8mm socket. Discard the old nut.

3 Clean the axle with a good quality degreaser.

4 Remove the old cartridge bearing. It should just fall out but, if it not, push a 8mm Allen key in from the other end to dislodge it.

5 Remove the old seal. Ours has partially disintegrated so we had to dig around for it.

6 Using a very thin flat-bladed screwdriver, lever out the old bushing. It might pop out, but snapping it into smaller pieces will make it easier to remove.

7 Clean out all the internals. A rolled-up rag soaked in degreaser pulled through the pedal body is a good way to get all the dirt out.

8 Fit the new cartridge bearing in the threaded end of the pedal body. To hold it in place smear on a small amount of grease.

9 Flip the pedal over and fit the new bushing. Followed by the new seal.

10 Fill the pedal with a good-quality grease and then install the axle.

11 Check the seal hasn’t deformed or flipped over.

12 Clean off any grease from the threaded part of the axle and install the 8mm nut. Tighten it until you feel it ‘bottom out’ on the end of the axle.
TOP TIPS:
The bushing should seat easily, but if not, push it in using a 8mm socket. Use the same thing on the seal.