 In the last couple of years, Fox suspension forks have been quietly moving into the mainstream, no longer the preserve of genned-up riders with built-up rigs. Product managers have noted the quality, and now the grey squidgers can be found on a huge range of off-the-shelf steeds.
Out-of-the-box performance is class-leading, and with only minor fettling you can keep it so. Lubing the foam rings is one of the most commonly mentioned tips, and it is a good idea to keep them moist.
However, rather than levering off the dust wipers and seals, chipping paint off the lowers in the process, and possibly scratching the stanchions, there is a very simple way of keeping the foam lubed. Once a week, store the bike upside down overnight. Before riding, compress the fork slowly a few times until the oil has been cycled through the damping cartridge and all air has been purged from the system. This will keep everything slippy, improving both the lifespan and performance — all without tools.
If you’ve left it too late, or you feel your fork could do with a little sprucing up, then theses pages should help.
For the sake of clear photos we took our fork off the bike. You do not have to do this, as all the steps are simple with the bike attached. You should take any disc-brake calipers off, however — fork oil and disc pads don’t mix, ditto the front wheel.

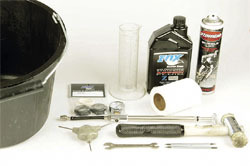
TOOLS FOR THE JOB:
Cleaning equipment
Bucket
Two small flat-bladed screwdrivers
Rubber mallet
10mm spanner
Allen key for any removable adjusters (model dependent)
Suspension fluid
Measuring jug
Shock pump
Dust Wiper Kit as required

1 Clean the forks as best you can. You want to try to avoid dropping muck into the fork legs during disassembly.

2 Remove the blue top cap on the left-hand leg and let the air out. Don’t be surprised if you get some oil escaping with the air.

3 Loosen the bolts at the base of each leg, three or four turns, but do not remove them totally at this stage. Note: some models, such as the F100X featured, have additional adjusters that do need removing.

4 Tap the loosened bolts with a rubber mallet to free up the damper rod and neutral rod. Remove the nuts entirely, but don’t lose the rubber crush washer.
5 Place a bucket under the whole assembly.

5a Pull the lowers downward off the forks. Oil will pour out once the rods separate from the lowers, so be aware and make sure the bucket is well positioned.

5b Cycle the damping cartridge through its range of movement to remove all the old oil.

6 Give the lowers another wipe over, removing any remaining grime

7 Remove the spring washer and keep it safe (unless of course you’re fitting new seals). Insert two small screwdrivers in the slots in the top caps opposite each other. Using lots of small movements, lever the top caps out of the lowers. DO NOT try to rush this step. Twisting the screwdrivers is a safer bet than trying to simply lever the whole wiper and seal assembly out.

8 Pull out the exposed foam ring, then clean the seal seats and remaining, newly exposed, parts of the fork lowers.

9 Drip fork oil onto the foam rings, soaking them well.
Use the same fork oil you will use for the internals.
10 Inspect your seals; if there are nicks or scrapes — or the fork had been oozing oil in use — replace with a new seal kit (part number 803-00-079).

10a Drop the wetted foam rings into the clean lowers, and…

10b Replace the dust wiper/ seals, making sure the seal sits firmly against the lowers.

10c At this point it’s a good idea to remember to refit the spring washers, as forgetting to fit them now means going through the whole disassembly again when you do remember.

11 Slide the lowers onto the stanchions, and rotate the whole assembly so that the fork is upside down.

12 Measure the correct amount of suspension fluid for your fork’s travel (details on foxracing.com/fox-tech-centre/index.htm: each year’s fork manual has oil volumes listed); a small mixing jug or large syringe is ideal. Our 100mm travel fork takes 30ml in the spring-side oil bath and 135ml in the damper leg.

12a Pour the correct amount in the correct leg through the hole in the bottom: large volume in the damper side — the one you twist knobs on — smaller volume in the side you pump up.

13 Install the crush washers and replace the bottom nuts. Tighten to 50lb/in. (Remember to refit additional adjusters, such as the bump-threshold adjuster on our F100X model.)

14 Turn the fork the right way up, attach the shock pump and re-inflate. You’re done!
However…
Before riding, make sure you cycle the oil around the internals. Compress the fork slowly five to 10 times to purge any air from the damper system and ensure correct function. Wipe off any excess fluid and gunk from your spruced-up fork and now, go ride.
TOP TIPS:
Cover the tips of the screwdrivers with a small piece of rag or electrical tape to prevent wayward slips scratching the stanchions. Gouges here mean a whole new crown and stanchion assembly: not cheap!