 Technical
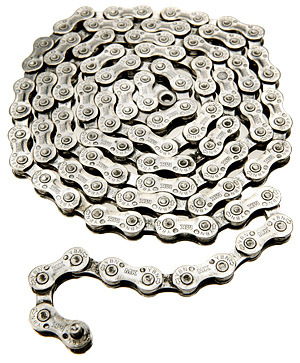
Chain games
Can you settle an argument about fitting new chains? They come covered in some filthy, sticky grease that sucks up dirt better than my Dyson. One of my riding buddies swears by degreasing them and then regreasing them with lube? Is it best to do this or just pour more lube on top of the grease?
Nick Thomas, email
The assembly grease used by most chain manufacturers does a very good job of lubricating the chain but as you have already pointed out seems to do a better job of attracting all dirt or dust within a 5-metre radius of your bike! Within a couple of rides the standard grease will have attracted that much dirt and debris the gear shifting would start to be affected and the front and rear sprockets would grow in weight and size! So in an effort to stop the chain acting like Velcro I would agree it is best to remove the sticky grease but rather than remove the chain and soak in degreaser which would remove the lubricating grease from inside the rolls as well as the troublesome grease on the external surface of the chain my preferred method is to scrub the external surfaces of the chain with an nylon brush soaked with degreaser. It is best to do this with the chain off the bike to avoid get any degreaser fluid or dissolved grease onto braking surfaces. Once you have scrubbed away most of the grease, rinse the chain with water, leave to dry then relube with a proper bicycle chain lube — not old engine oil! The old school approach to this problem was to immerse the whole chain in degreaser (usually paraffin), which would give you a beautifully clean chain but stripped of all its lubrication including the all important internal pin/roller interface. This area has to cope with very high loads and will wear quickly without an appropriate lubrication. Whilst most bottle/aerosol lubricants can provide a good instant surface coating to the chain it can take a while for these lubricants to work their way into the rollers so you can see why it is best to leave the lubricating grease within the rollers rather than risk riding with a dry/semi lubricated chain which will wear quicker.
Lose the tubes
I finally decided to try tubeless tyres. I bought a pair of Continental Vertical Pro 2.3s but was surprised to see that the manufacturer’s recommended pressure is 45 psi. That’s only a tad less than the pressure I used to use in my tubed tyres so I don’t appear to be enjoying the well documented advantage of running much lower pressures. Can you give any guidelines on tubeless pressures for general trail riding or do I stick with the recommended 45psi (Rider weight 160 lb)?
Peter Astle
There is much confusion about the pressure, weight, rolling resistance and puncture resistance of tubeless tyres and wheelsets. The majority of riders (and a good proportion of the cycle industry) misunderstand what the tubeless system is aiming to achieve. You should indeed expect a plusher ride on a tubeless wheelset when compared to a standard tyre/tube combination but the surprise is this will generally be achieved at the same pressure on both wheelsets. Because the single “skin” of the tyre supports the rider on a tubeless wheelset, compared to double tyre and inner tube “skin” in a standard set-up the tubeless tyre is able to compress more easily, this tyre deflection is in effect a type of suspension. The ride is
further enhanced by the fact that the outer “skin” (tyre) is not rubbing against an inner “skin” (tube) at its deflection/contact area with the ground. This interaction between tyre and tube does consume energy in the form of friction. Hopefully, now you can begin to understand why a tubeless wheelset at the same weight and pressure as a standard wheelset can feel plusher and quicker. Obviously, an absence of inner tube means there is nothing to suffer pinchflat/snakebites type punctures on, which does allow the rider to lower the pressures to gain an even softer ride and more grip offered by the related increase in the tyres footprint. This increased footprint can be a disadvantage for cross country use as there is an increase in friction/drag but for downhill the opposite can be true where grip can be all important. There is still potential to develop the tubeless system further and I’m quite sure the weight will drop on XC tubeless and it would be nice to see freeride and downhill tubleless technology match that of motorcycle trials where although it looks like the riders are riding with flat tyres their tubeless is being run at just 5psi (and still seals perfectly well at this pressure)!
Braking point
I bought a GT Avalanche 1.0 Disc about eight months ago and its been great, but recently as I was adjusting the front brake pads I’ve found that the adjuster is wound in all the way, but the pad is still quite far from the disc, consequently the brake lever has to be pulled right back to about 0.5 to 1cm from the handlebars. Is this supposed to happen? And if not how do I rectify the problem? Great mag and thanks.
Tim, email
First off, make sure the lever’s reach adjustment is not set so as to position the lever too close to the handlebars.
Next, you may not be aware that the outer piston has a screw adjuster and not just the inner pad. If both outer piston and inner pad are at the limit of their adjustment then it is likely the excessive lever play is the result of very worn disc pads.
Drop the front wheel out of the forks and visually check the wear on the disc brake pads. If you are down to the last 1mm of pad material, change to new pads, reset the adjusters and you should be OK for the next eight months.
However, if on inspection the disc brake pads still have plenty of material left, say 2-3mm, this indicates the brake will need bleeding as the excessive lever travel is due to an underfilled brake and not because of worn out pads.
Directions on how to bleed the Hayes Sole brake are available online at www.hayesbrake.com. If you don’t feel confident contact your local IBD.
Under pressure
I have just found your superb magazine and am now hooked. You have found a very good balance of items to appeal to everyone, well done. You are also one of the few who the ordinary person on the street can contact for help and advice, and as you are, was hoping you could point me in the right direction with some suspension advice?
My wallet not being overly fat, I recently purchased a hardly used immaculate Dawes full-suspension 2003 Edge. The previous owner brought it closer to the Team spec by upgrading the brakes and he had fitted a Shockworks XA series air shock. The front shocks are the standard Marzocchi EXR comp air shocks.
Question:
1) What is the max air pressure allowed for both units?
2) What air pressure should I put into each unit to suit a rider of 15 stone? I have written to Dawes, and various other companies and have had no reply. I would be very grateful for any help you can give me — I don’t want to damage the units. Many thanks for your time and help, keep up the good work.
Kim, email
The forks and shock fitted to your bike were not readily available as aftermarket parts, which helps explain the lack of information available. Normally you would be able to use the internet sites for gaining tuning and settings information but there is no site for Shockworks, and Marzocchi’s normally exhaustive list is missing technical information for the EXR Comp Airs. That said, the following information should start you off in the right direction.
For max air pressure I would recommend staying below 100psi for your Marzocchis and below 300psi for the rear Shockworks shock. Coincidentally, this falls in line with the range offered by Marzocchi’s fork pump and most people’s rear shock pump.
With regard to the recommended pressures front and rear for a 15-stone rider, I would start with 50-55psi in each leg of the front forks then see what sag and overall travel feels like before doing any further small adjustments as necessary. You should note that this pressure may cause the forks to top out, which can be overcome by removing the top cap and increasing the internal damping using a long Allen key.
On the rear the aim is to increase the air pressure up to a point where the shock sags 25-30 per cent of its travel with the rider sat aboard the bike, again you may need to increase the damping as the pressure is increased to combat topping out.