 FFSSSSTTT, tup-tup-tup-tup…it’s a noise any cyclist, whether newbie or wizened old hand, dreads.
The loathsome puncture afflicts every last cycle-borne traveller at some point. But, once you’ve familiarised yourself with the basic procedure outlined on the next couple of pages, it’ll just be a simple repair rather than another hair-pulling incident.
As every Boy Scout knows, being prepared is the key. Carrying the bare minimum of a spare tube and a pump will suffice, but a couple of tubes and puncture repair kit is a worthwhile, belt and braces, option. Wide mountain bike tyres can almost always be removed without any tyre levers with the correct technique, and putting the tyre back on really should only be done with just thumbs. Pinching the tube between tyre and rim results in repeating the whole procedure and, as punctures often occur at the onset of a torrential storm and no shelter, it’s something best avoided.
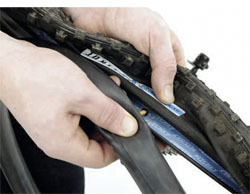
Thick downhill tyres, skinny road tyres and small kids’ bikes can need the levers, but using the correct technique will prevent them snapping or bending. Whatever you do don’t raid the kitchen drawer, because spoon and fork handles damage soft aluminium rims.
If your tyre’s sidewall’s been cut by some errant flint or rock, a piece of plastic between the carcass and tube can prevent the tube poking out of a hole and will get you home. Park Tool even makes thick stickyback plastic (TBC-1, £2.99 for a pack of three) designed for this very situation. It’s worth shoving some in your trail pack if you’re planning a big day in the hills. However, these ‘tyre boots’ should only ever be temporary measures, however solid the repair seems.
Hopefully, this small amount of knowledge will prevent a simple puncture ruining your day out.
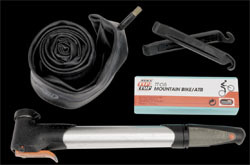
TOOLS FOR THE JOB:
Inner tube
Puncture repair kit
Tyre levers or a strong pair of hands (preferable)
Pump
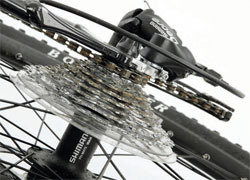
1 If your puncture is in the back wheel, before anything else click your gears down to the smallest cog. Not only does this make getting the wheel out easier, but it makes replacing the wheel simpler later on.
2 On the back wheel, the quick release lever just needs flicking open. Do not unscrew the nut on the other side. For the front, you may have to loosen the nut to clear a lip on the dropouts.
3 If your valve stem has any caps or lockrings, remove them. Expel any remaining air. With a Presta valve, unscrew the small nut at the top of the valve and push down. For Schrader, push down the, small, pin-like central core.
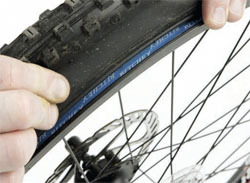
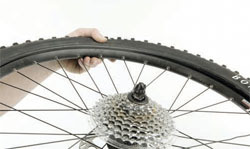
4 Pull the tyre bead away from the edge of the rim all the way round the wheel on both sides. This loosens the whole tyre.
5 You should be able to pull the tyre upwards and away from the rim with your fingers. Once it’s cleared the top edge of the rim, push it over with the thumbs.
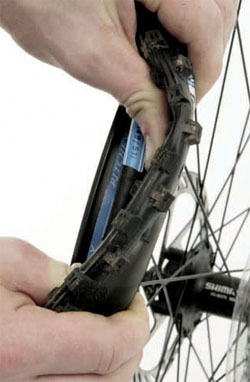
6 Once the first part of the tyre is free, run your fingers around the remainder of the tyre. You only need to loosen one side of the tyre, not remove it completely. At this point you should check the inside of the tyre for whatever caused the puncture. Pull any foreign objects out. Be thorough. If your tyre went down very fast, and on inspection the tube has two large longitudinal slits, it was an impact puncture, caused by trapping the tube between the tyre and rim.
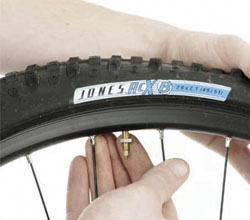
7 Pump enough air into your spare, or repaired, tube, for it to hold its shape.
8 Push valve through rim hole to keep tube in place. Do not pull it all the way through, or screw on any lockrings.
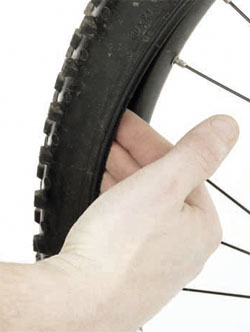
9 Insert semi-inflated tube into tyre all the way round. Pop tyre down so that the bead is next to the rim.
10 Check valve isn’t pulled through too far. You should be able to see half of the stem, no more. Tuck the bead into the rim, starting opposite the valve. Hold the wheel next to your body, and work both hands around the wheel towards the valve. You should end up with a 6-8in tight section around the valve.
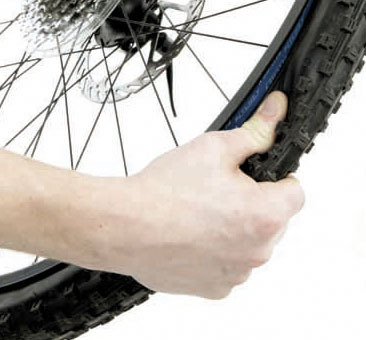
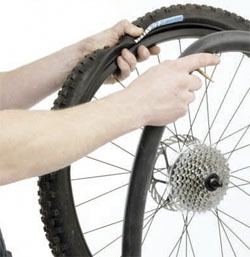
11 While holding the tight section in place, go round the rim pushing the tyre away from the rim. You will have enough slack to push some of the tyre on. Repeat the process as necessary. Resist the temptation to reach for the levers.
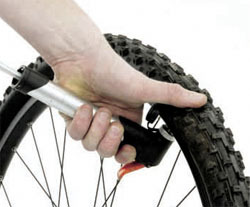
12 When pumping the tyre, support the pump head and valve, as over zealous inflation can rip the valve from the tube. Only when the tyre’s inflated should you screw any lock rings on.
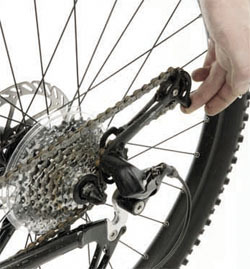
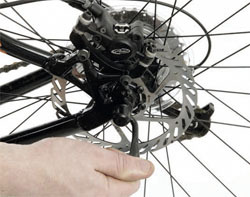
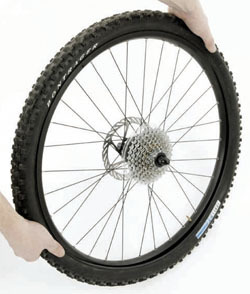
13 For the front wheel, keep the bike the right way up. The weight of the bike will centre the wheel in the dropouts. Hold the quick-release lever at 90 degrees to the fork leg, screw the nut until the lever holds in place, close the quick-release lever. It does not need excessive force. For the rear wheel flip the bike upside down, hold up the higher run of chain and place wheel on the smallest cog. Lifting up the rear of the derailleur should make the wheel drop into the slots. Take care to line up the disc brakes. Flip the quick-release lever closed and you’re away.
.jpg)
TOP TIPS:
If you need levers, insert the first two level with spokes and clip them on. Insert the next level with the next spoke and clip on, remove central lever and repeat.
If fixing a puncture, never forget to rub the hole with sand paper, or allow the ‘glue’ to go tacky. Follow any kit’s instructions carefully.