 Compared to the rear, the front derailleur is pretty crude: it literally bashes the chain from one chainring to the next. True, there are ramps and pick-up pins on the chainrings and various profiled sections on the derailleur’s cage to make things easier, but its function is definitely the least sophisticated on a mountain bike. Thankfully you rarely get many problems with the front derailleur, but if you do need to replace it — say because it’s worn out or seized — there are a few steps you need to follow for flawless front shifting.
The first thing is to get the correct derailleur for your bike. The clamp (or band) that fits round the seat tube comes in one of three sizes — 28.6. 31.8 or 34.9mm — but new Shimano derailleurs use a Multi-band system. This type comes with two sets of clip-on shims that allow you to fit the derailleur to any tube size. Most new derailleurs are also Dual Pull, meaning they can be configured for top or bottom pull cable routing. There’s a small glitch with these new mechs though, instead of being screwed together, the inner and outer cages are now riveted together. This means you’ll need to split and remove the chain when fitting a replacement. Shimano says that’s normal, but we think it’s a hassle.
Once fitted, the derailleur needs to be parallel to the rings because, if it’s slightly off, then the chain can rub or derail unexpectedly when shifting. As their name suggests the ‘high’ and ‘low’ limit screws limit the derailleurs movement. They come factory set and should only need a tweak out of the box.
A cable (preferably new) needs to be attached in the designated groove on the arm of the derailleur. Any slack that develops over the first few weeks then needs to be taken up by turning the barrel adjuster (located on the shifter) outwards a quarter turn at a time. Most shifting problems involve the chain not dropping down to the smallest ring, so a slight tweak of the ‘low’ limit screw may be required during set-up.
When it comes to periodic maintenance there’s not much you can do other that keep the thing clean. The pivot pins on most front derailleurs are coated with Teflon, so require very little lubrication, but Shimano does recommend an occasional squirt of GT85 or similar.
TOOLS FOR THE JOB:

5mm Allen key / Pliers / Cable cutters / Gear cable and end cap / Chain splitter / Teflon-based lube / Flat-headed screwdriver

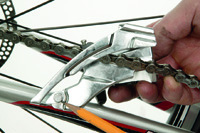
1 Some newer derailleurs have riveted cages. You’ll have to split the chain to remove this one from the frame.

2 The two different shims of Shimano’s Multi-band system. Grey is 28.6mm, black is 31.8mm. The clamp without a shim is 34.9mm.

3 Only lightly clamp the 5mm bolt. This allows you to tweak the position of the derailleur for the following two steps.

4 Set the distance between the cage and the chainring to 3mm. New derailleurs come with a red sticker that acts as a guide.

5 Align the derailleur so the cage is parallel to the chainring.

6 There are ‘high’ and ‘low’ limit screws on all front derailleurs (we’ve painted ours with Tippex so they stand out). These stop the derailleur pushing the chain off the larger chainring or into the bottom bracket.

7 With the chain on the largest rear sprocket and small chainring adjust the ‘low’ limit screw so the inner cage is nearly touching (say a millimetre away) the chain.

8 Before attaching the cable, wind the barrel adjuster out two full turns. This allows for fine-tuning later on.

9 Attach the gear cable and shift the chain to the big chainring/small rear sprocket combo. Set the ‘high’ limit screw so the outer cage is just proud of the chain.

10 Run through all the ‘extreme’ combinations — all rings and on both the smallest and largest sprockets. If the chain rubs on either side of the cage you can tweak its position by increasing or decreasing cable tension.

11 If you’re having trouble shifting, it may be because the crank is too far inboard. A thin spacer between the cup and bottom bracket shell can push the crank out just enough.

12 On the right a new Wide Link front derailleur. It’s stiffer and offers crisper shifts, but it’s not compatible with some full-suspension frames with lower mounted pivots. Make sure you buy the correct derailleur for your bike.
TOP TIPS:
When fitting a new mech, nip up the derailleur clamp bolt to stop it falling out on the workshop floor.
An easy way to set the 3mm distance between the cage and chainring is to use a
3mm Allen key wedged between the gap.