Positions of power.

Strong and stable is a great mantra, but if you don’t want to end up like Theresa May, you’ve got to dial your posture.
>>> Check out all our free technique guides
It’s easy to have control when the trail in front of you is smooth and the obstacles are easy to roll, but how do you keep that same level of control when the trail in front of you is rugged, steep and has limited grip?
We’re going to look at how some riders seem to skip effortlessly down a trail without looking like they’re struggling at all, how you can raise your game and stay in control when it gets stressful, and how you can neutralise your body weight so that you can make it count in all the right places.
Potential energy
For you to be able to neutralise your body weight, absorb impacts effectively, and generate pressure on the trail for traction, you’re going to have to think about two things. Firstly staying low and centred on the bike, and secondly using that low position to be able to push back in to the trail with your legs. Having more room to move around on your bike will mean that you can enjoy more control and be able to handle bigger features as they come at you. Having limited range of motion will mean that you have limited control. Remember, the control comes from pushing in to the places where you can see you have grip, NOT by pulling and lifting over the seemingly slippery parts.
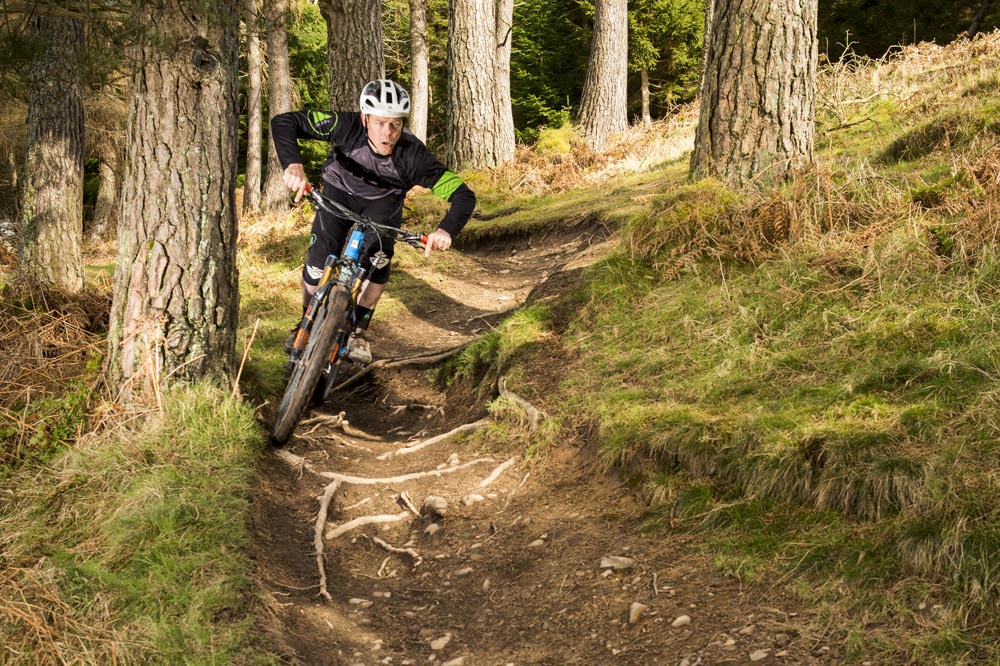
Here Andy gets ready to use a deliberate push towards the ground to get control. He’s already aiming for the smoother trail around the outside of the roots, but will be able to generate a change of direction through going heavy because of the range of motion he’s prepared on the way in.
Arms race
Bend your elbows. Seriously. Bend your elbows. We coach hundreds of sessions and classes a year and this is by far the most common advice that we give to people. As soon as the trail gets steep, intimidating, or rough, your average mountain biker will just go right out the back of their bike. What this means is that you’ve given up any control that you would normally have been able to enjoy on an easier trail. Keep your arms bent at the elbows and your head closer to the bars and you’ll enjoy a lot more control as your bike starts moving around.
Neutral riding position
Try and keep your head in the middle of the bars at all times. You should be roughly above your stem and bars and your head should remain there as you bend your elbows to absorb impacts. A neutral, stable body position comes from your head and torso remaining still even when your bike is sliding about underneath you. As soon as you allow your elbows to straighten and your weight to start creeping back, your control will become very limited indeed. Stay strong and neutral through your elbows, shoulders and torso, and you’ll be able to enjoy a much more stable ride.

The balance is way off here. Limited range of motion will mean that Andy has almost no control on the direction he goes in and will feel all the effects of the soft ground.
Disconnected
Use YouTube to go back a few years to when “Get your weight back” was the way to do it, and you’ll notice that riders in the 90’s and early naughties had their hips pretty much fixed above their saddles and that they used their upper bodies to balance by moving their heads and shoulders along the length of their handlebars from side to side.

You can see that Andy already has his body lined up with the direction that the trail goes in. There isn’t a huge amount of grip here so he has to compensate by exaggerating his body movements on the way in to allow him stability when it starts to slide on him later.
Look at any modern footage of a good, competent rider nowadays however and you’ll notice that the top half of their body has become very still and stable, and that the disconnect for balance now happens at the hips and knees. This allows modern riders to be able to rely on the technology of their bikes a lot more and take advantage of much more stable angles, suspension and grip without feeling like they’re ever off balance.

Even on this mild hip jump Andy is lining his body, and most importantly his hips, up with the direction that he wants to turn in. It means that as he lands he’ll be able to enjoy that solid feeling of being in control, and that all of his momentum will be going in the direction that he wants to go in.
Angulation
This is the calm, controlled and stable way to change direction nowadays. Essentially it’s the act of lining your hips up in the direction that you want to go in before you actually get there. Some riders are subtle with this, some a little more exaggerated, but it’s always there if you look for it in a good rider. Once you start doing this you’ll likely find that your knee pads are hitting the top tube of your bike more often and that your saddle starts hitting you in places where it didn’t used to. This means that you’re correcting your balance by moving your knees and hips and hopefully not your shoulders and head which should still remain calm and centred. Remember to line up your hips in the direction you want to go in before you’ve actually got there.

Hopping over bigger roots may look fancy, but there’s so much grip either side that to the rider in question they will always feel like every time they’re in contact with the ground that they have solid, reliable, and predictable grip through creating pressure in all the easy places.
Under pressure
As long as you start off low you should be able to generate a heaviness in places where you want to create grip by straightening your legs and forcing your bike down into the trail. This will make a swooshing noise if you time it right and should feel like you’re going heavy as you change direction. Start looking for places on the trail where you have control. Then make sure that you are heavy as you roll over them by pushing down with your feet, and you’ll be able to enjoy a lot more reliance on stability instead of sliding around and using those same grippy places to get your balance back.
Fancy footwork
Keeping your feet level with whatever ground you’re on is a good rule of thumb. If your bike is leaned over on a flat corner then your outside foot will be down, but make sure you still have room to move in your knee. If your outside leg is completely straight then you have no way of moving to control your grip. As long as your legs can bend you can create pressure by pushing down into the ground, or you can back off if you start to slide. Remember to keep your heels down and your knees tipping in whatever direction that you want to go in. Dropping your outside foot isn’t entirely wrong, but there’s more to it than just straightening your outside leg and steering with your arms. Stay dynamic through keeping low and being able to push back depending on how much traction is available is the way to generate control and momentum out of turns.

When you see riders coming out of turns with their front wheels off the ground, they’re not lifting the bars, they’re pushing so heavily and powerfully with their legs to create grip that they’re generating a manual.
Grippy
The secret to riding challenging trails is to allow for movement. You can generate traction by going heavy in places and lighter in others, but you can only do this if you can move around on your bike. Maintaining a stable body position and turning with your hips will take a lot of practice, but it will allow you to enjoy a level of control that will actually feel like you’re going slower initially. Take the time to practice this neutral body position, and balancing with your hips and knees, and you’ll find that the intimidating trails will actually provide you with more control than you previously thought available.

Linked turns
Linking difficult, steep turns together is something that expert riders make look easy. Break it down however and there’s not really a lot to it. Firstly give yourself plenty room to move by keeping your body position low. Don’t move back as it will limit how far you can move, instead try and keep your shoulders roughly in line with your bars and your hips in line with wherever you’re going next.
On the way Andy already has his elbows and knees bent so that he has plenty of room to move. He’s not turning the bars and leaning away from where he wants to go, but instead lining his body up with a part of the trail that is still in front of him. In the middle the bike has started to loose grip on the softer ground. Staying on target and letting it do it’s thing is really the key here. You can balance with your hips and knees here instead of stiffening up your arms and pulling the brakes on. The outside foot is down but crucially he still has room to move with his legs. He’s not locked out. Instead he’s deliberately adjusting how much he moves and pushes in to the ground so as to determine his levels of grip. The whole body will still be lined up with the exit of the turn.
There’s an app for that!
Dirt School’s free coaching app lets you see the right and wrong techniques in slo-mo.
Download it for free here: Google Play | iTunes Apps
Words: Andy Barlow
Photos: Andy McCandlish