How to transform your ride
We’ve shown how your bike’s geometry influences things, now we look at how you can manipulate components and settings to improve your shape on the bike.
>>> How to set up mountain bike suspension
Topics covered in this guide
- Rider position
- Suspension set-up
- Tyre & wheel sizes
- Offset shock hardware
- Angle-adjust headsets
- Over-forking
- Eccentric bottom brackets
- Custom linkages/shocks

My journey into understanding and adjusting bike geometry began in earnest over two decades ago. At that time, I was trying to adapt a full-suspension trail bike into a downhill race machine. The goal was simple: make the bike slacker and lower, and at the same time add some much needed progression to the coil-sprung suspension.
>>> Mountain bike geometry explained
The first step was to make a scaled drawing of the frame, suspension linkage and the bike’s geometry. I then calculated where the shock needed to be mounted in order to achieve the numbers I so desperately desired. Just as I was about to drill a hole in the frame and reposition the shock, it dawned on me that if my calculations were out, the only thing I would achieve would be to seriously devalue my bike.
So instead of drilling the frame, I sold it and bought an Intense M1 SL – a frame with more holes in than I knew what to do with. Pretty much everything on that Intense was adjustable, much in the same way as brands employ test mules today to trial different geometry concepts without having to build unique prototypes for each new idea.
And while that old Intense taught me a lot about bike geometry, suspension and how adjusting both can impact ride quality, it was really just the beginning of a journey that I’m still on today. Now though, the tools at our disposal for tweaking geometry are much more sophisticated, so there’s really no need to break out the Black & Decker if you want to slacken your head angle or lower your BB height.
My thinking on bike geometry has evolved too. In a nutshell, bike geometry affects the weight distribution of the rider, so if you want to change that, adjusting the geometry is an easy way to go about it. It’s not the only way, however.
How we position ourselves on the bike affects weight distribution too, and something as simple as the pedals you run can make a big difference – the straightforward act of dropping your heels to keep your feet firmly planted on flat pedals having a knock-on effect all the way up the kinetic chain.
So before taking a deep dive into all the main options for physically altering your bike, what better place to start our tweeker’s guide to mountain bike geometry than by taking a closer look at how simply changing your riding position impacts geometry and handling.

And lowering or raising your stem can help redistribute your weight on the bike
Rider position
By far the easiest and most cost-effective way to change the ride dynamics of your bike is to manipulate how you interact with it. Being conscious of your weight distribution when riding, and actively changing it, however, can be difficult. It’s like trying to change how you sit at your desk. Being told not to slouch in the chair is all well and good but it doesn’t do much to actually change your habits. Adjust the set-up of the chair, however, and we can really help cement better posture. It is no different with the riding position on your bike.
>>> Guide to the best mountain bike stems
Let’s say you want to load the front tyre more to increase grip on flat corners. One way to do it would be to simply bend your arms more to help shift your weight over the front end and actively load the front tyre. But just like the seated posture example given above, that’s going to be a difficult change to instil, especially if you’ve been riding for any length of time. A more effective approach would be to simply lower your stem height by 5mm. And while that sounds like a tiny change, because it alters the position of the single heaviest component on the bike – you, the rider – you’ll be amazed at how big a difference it can make.

Rolling your handlebar forward or back is another simple way to alter weight distribution without having to change the stem length or height. If you find yourself too stretched out on descents and struggling to get off the back, rolling the handlebar towards you by a couple of degrees will automatically shift more of your weight to the rear of the bike and give you the wiggle room you need.
>>> Guide to the best mountain bike handlebars
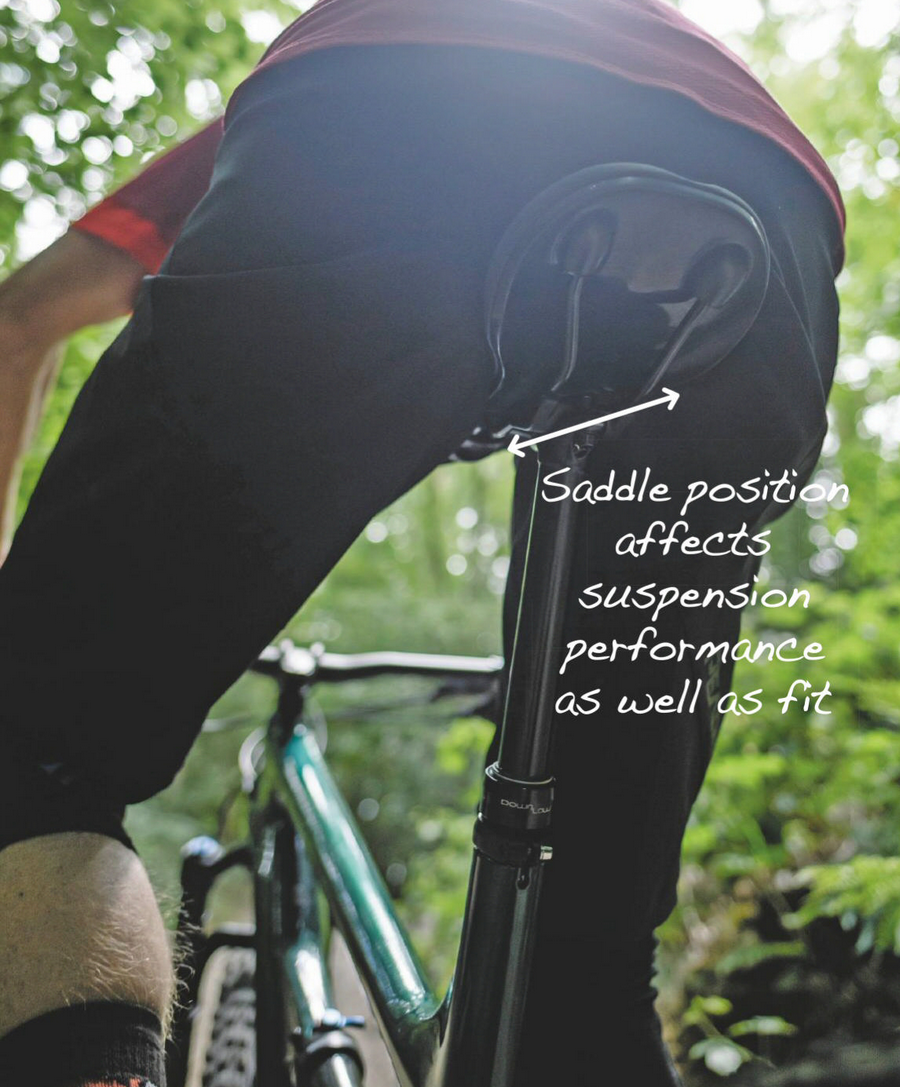
Saddle position and seat angle has very little impact on the overall handling of the bike, when it comes to seated climbing, fore-aft saddle position can be game changing. One of the biggest mistakes we see taller riders make is slamming the saddle all of the way back on the head of the post to create more space in the cockpit. While this will improve the overall fit, it also places more of the rider’s weight over, and even behind, the rear wheel on really steep climbs. Altering your riding position has downstream effects on suspension too. So something as simple as sliding your saddle rearwards increases how much the suspension compresses under the rider’s weight; a compounding effect that generates a less-optimum pedalling response. And let’s face it, no one, especially taller, heavier riders, needs to make climbing harder than it already is. So slam that saddle forward on the head of the seapost and start to gain the benefits of a more forward riding position on the climbs.
>>> Guide to the best mountain bike saddles
Suspension set-up
When we look at bike geometry, we’re looking specifically at static numbers with the bike un-weighted. Plonk a rider into the mix and complexity increases by a factor of 10. Rider height, rider weight, body proportions, set-up and riding style all impact the dynamic geometry. By eliminating all of that noise, static geometry actually becomes a useful way to compare bikes. It’s in the noise, however, that we can begin to manipulate the geometry.
And the bandwidth is massive. On a 150mm-travel trail bike, the variation in head angle can be as much as 8° from the fork topped out to fully compressed. And it’s that range that makes it easy for us to play with the dynamic geometry and the weight distribution of your ride.
Sag is a measurement of how much suspension compresses under rider weight, and there are no hard and fast rules as to how much you should run. A good guideline is 25-35 per cent of available travel on the rear and 15-20 per cent on the fork. That gives you a massive window of adjustment, without even going beyond the recommended settings.
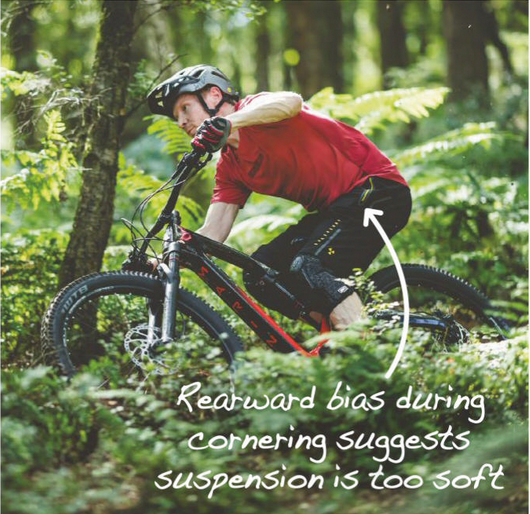
And once again it all comes back to weight distribution. Ever get the feeling that you’re hanging too far off the back of the bike mid-turn? Chances are, you’re running your shock too soft. If that’s not the case, then it could be that your stem is too high, too short, or your handlebar is rolled back too far.
Also, don’t be afraid to play with the damping adjustments on your fork and shock. In the example outlined above, it could also be that the rebound damping on the shock is too slow, so it can’t recover quickly and actually holds the rear suspension down mid-turn. On repeated hits the same set-up will also result in the shock packing down, transforming your otherwise soft, squishy suspension into a harsh, unforgiving ride.
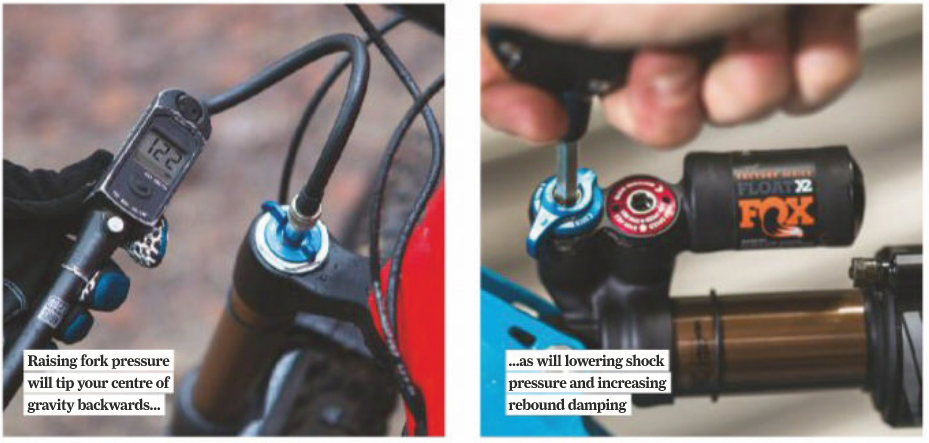
In the simplest of terms, reducing the rebound damping will cause the suspension to ride higher, as will adding compression damping. So if you’re actively trying to bias the weight distribution of your bike, you’ll need to take the opposite approach at either end of the bike to have a noticeable impact. So if it’s a lower, slacker set-up that’s biased more toward descending, you’ll want to run your rear shock a little softer on spring pressure with more rebound damping so it settles deeper in the travel to slacken the head angle, lower the BB and shift rider weight rearward, while simultaneously running more air in your fork, with less rebound damping and more compression to prop up the front end.

Mismathced mullet wheels shave down a bikes head angle and BB height
Tyre & wheel sizes
Tyre width can also affect bike geometry. Wider tyres elevate a bike and subsequently the BB height, while narrow, lower-volume tyres reduce the overall height of the bike. And given that there’s no rule about running the same tyre size front and rear, we can use this to our advantage to manipulate the numbers. Switching to a fatter tyre up front and a smaller one on the rear won’t change the BB height much, if at all, but it will slacken both the head and seat angle a touch.
>>> Guide to the best mountain bike tyres
Granted, small changes in tyre size aren’t going to bring about dramatic shifts in geometry, but changing wheel size certainly will. And that’s because there is a 19mm difference in height from the contact patch to the axle between a 27.5in and 29in wheel when both are shod with the same tyre. Now, given that most flip-chips offer less than 7mm of BB height adjustment, it should be clear why one frame cannot be optimised for both wheel sizes.
>>> Guide to the best mountain bike wheels
But just like running different tyre sizes front and rear, there’s nothing to stop you from having a 29er wheel up front and a 27.5in out back. Affectionately known as a mullet bike, fitting a 27.5in rear wheel is a great head-angle hack on older 29ers. By changing just the rear wheel, you don’t get the full 19mm of BB drop that would render most bikes un-rideable, but it will lower the BB height by 10mm and chip approximately 1° off the head angle. And if your frame has sufficient clearance, using a 2.8in Plus tyre on the rear can make great halfway house, at least in terms of geometry adjustment.

Offset shock hardware oofers a cheap geometry tweak
Offset shock hardware
One of the easiest and most affordable ways to adjust bike geometry is with offset shock hardware. It works much in the same way as a flip-chip, but instead of flipping the shock mount in the frame, offset shock hardware changes the effective eye-to-eye length of the shock. Shortening the eye-to-eye length compresses the suspension linkage, lowering the BB height and slackening the head angle, without the shock actually being compressed. Reversing the process steepens the head angle and raises the BB height.
The range of adjustment that can be achieved with offset shock hardware is restricted by the shock eyelet diameter and the size of the shock mounting bolts. With 8mm shock bolts, offset hardware typically offers 2mm of offset at each end, increasing to 3mm with 6mm shock bolts. That doesn’t sound like much, but because the shock is leveraged, these small changes quickly add up.
You can use one or both sets of offset hardware to fine-tune the degree of geometry change, and which option you go for will largely be determined by tyre/frame clearance at bottom-out. It’s not uncommon for tyres and seatstay bridges to hit the back of the seat tube at full bottom-out when both sets of offset hardware are installed.
Also, with the increased popularity of trunnion-mounts, most modern bikes are automatically restricted to using offset hardware at only one end of the shock. In fact, the latest Specialized Enduro and Stumpjumper both come stock with offset shock hardware at the link end of the shock to offer high and low geometry settings.
It’s enough to drop the BB height by 7mm and slacken the head angle by 0.4°. The hardware on the Specialized is keyed to the link to stop it rotating, but if you wanted a third, mid-geometry setting, you could simply fit regular hardware.
By far the best thing about offset shock hardware is that it’s cheap and requires no specialist tools to fit. Brass hardware tends to be the most affordable as it’s soft and easy to machine, but if you want something more durable, Burgtec’s Ti offset shock hardware, at £19.99 per end, is hard to beat.

Angle-adjust headsets
Steering geometry is complex. And even more so now that most forks are available in multiple offsets. Without going down another rabbit hole, fork offset is simply how far the axle sits in front of the steering axis. RockShox offers 51, 42 and 38mm offsets, while Fox use 51, 44 and 37mm – most bike manufacturers settling on the middle ground.
Swapping from a fork with a 51mm offset – which was pretty standard on 29ers up until a couple of years ago – to a 38mm will reduce the length of the front centre by roughly 13mm. And because the fork is angled, reducing the fork offset also raises the front end of the bike slightly. And by slightly, we mean 5mm, which is less than the acceptable variation in the axle-to-crown height of a fork. So, even if a shorter-offset fork could, in theory, be useful for reducing an overly long front end, it’s not worth considering for head angle adjustment. Especially when a new crown steerer assembly is likely to set you back £300.
A much more effective way to modify the head angle, both in terms of price and range of adjustment, is with an angle-adjust headset. Depending on your frame and fork compatibility, angle sets can offer anything from +/– 0.5° of adjustment to +/– 2°. If you go with the full 2° of adjustment on a 150mm- travel trail bike, the front centre measurement will grow by 15-20mm depending on fork length and how steep the bike is to begin with. The slacker head angle will also lower the head tube and BB height ever so slightly. And that’s the real beauty of using an angle set; it doesn’t have a big impact on BB height. But before you go and bang out your existing headset cups with a hammer and screwdriver, check to make sure that they are actually removable, as plenty of carbon frames have cups that are bonded in.

Upping fork travel will move the geometry dial but could void warranty
Over-forking
To over-fork a bike simply means fitting a longer-travel fork than it came with as standard. Let’s say you have a 130mm-travel trail bike, where travel is balanced front and rear. Bumping the fork travel up by 20mm, to 150mm, will slacken the head angle by approximately 1° and increase the front centre measurement by 10mm. There will also be an associated increase in BB height, so if the bike already has a relatively high BB, it’s probably better to use an angle-adjust headset or offset shock bushings.
>>> Guide to the best mountain bike suspension forks
In fact, the biggest advantage of fitting a longer-travel fork is getting the extra travel up front. And lots of bikes come over-forked as standard for this very reason. Also, because fork platforms tend to span a travel range, oftentimes the exact same chassis is used from 140mm travel all the way up to 170mm, with nothing more than an air-spring assembly change. So in many cases you don’t even need to change your fork to increase the travel – simply replacing the air-spring assembly will suffice. You can hop-up a RockShox Lyrik from 150mm to 170mm for as little as £40. But there are limitations. Some forks aren’t designed to be extended, especially if you’re already at the upper range of travel for that particular platform. A more important consideration is that most frames are designed and tested to failure with a specific fork length/travel in mind, so in most cases, over-forking your bike by more than 10mm will void your warranty.

An eccentric BB offers 3mm of adjustment
Eccentric Bottom Brackets
One of the best geometry hacks that flies under the radar, is the eccentric bottom bracket. Designed originally as a way to tension the chain on singlespeeds that don’t have slotted dropouts, the eccentric bottom bracket makes for a great geo-hack if your bike has a BB30 shell.
Rotating the oversized bottom bracket to 12 o’clock raises the BB by 6mm, while the six o’clock position lowers it by the same amount. Three o’clock and nine o’clock offer the same range of adjustment, but instead of altering the BB height, they change the horizontal position of the BB relative the front and rear axles. Neat, eh!
You also have everything else in between. Granted, the range of adjustment is limited, and with the oversized PressFit BB30 standard falling out of favour, using an eccentric BB as a way to tweak your geometry is more limited than ever. Still, if you have a older BB30 bike and a regular set of cranks, it’s a great way to manipulate the geometry.

Cascade Components: custom link makers
Custom linkages/shocks
The ‘90s were a crazy time in mountain biking and custom shock links that boosted travel with no regard for leverage rate or geometry were popular. Nowadays, a more sober approach to bike engineering prevails. Companies like Bike Yoke and Cascade Components provide custom links for tweaking geometry and travel – a great example being the V3 Santa Cruz Bronson LT link from Cascade Components. Not only does it make the suspension more progressive, to better resist bottoming, it ups the travel to 160mm and lowers the BB height by 2.5mm, so the dynamic BB height will be even lower.
If you have an older Specialized, swapping to a Bike Yoke link means you’re not tied to Specialized’s wacky keyed shock-eyelet design of old. Yes, it means you’ll also need to shell out for a new shock, but this instantly enables you to use offset shock hardware to tweak the geometry, just like on the most recent Specialized designs.
In some cases, custom shock tuners also have the ability to physically change the eye-to-eye length of a shock to alter the geometry, while keeping the stroke and travel unchanged. Also, there are plenty of shocks that have the same eye-to-eye length, but different strokes, and by changing the stroke and travel, the dynamic geometry changes due to the increased suspension sag, even if the static numbers are identical. With any shock swap or reduction, including something as simple as offset hardware, always check clearance at bottom-out. That could be something as simple as the rear tyre buzzing the back of the seat tube, or something as sinister as the seatstay bridge smashing into it. Shocks with remote reservoirs present additional problems, so it’s best to check that any potential changes will in fact work, before splashing out on a new shock or drilling a hole in your frame.

Putting it all together
If you’re still with us, congratulations, as that’s a lot of tech info to digest in one sitting. Yes, changing the geometry of your bike sounds daunting, but bear in mind that the end goal is simply to manipulate the centre of gravity of the rider.
Experimentation is key to understanding how different adjustments impact handling, so we recommend doing it in bite-size chunks, one change at a time. Start with a top-down approach, as it’s the easiest to implement. That could be something as simple as changing your stem height, sliding the saddle forward on the seatpost, or bending your arms more to achieve a more dynamic riding position. We call these top-down changes, as they all alter weight distribution and handling without physically changing the geometry of the bike.
Ground-up changes act on the bike itself. These could be as straightforward as fitting smaller-volume tyres to lower the bike and increase stability. Alternatively, it could be something more complex, like installing an angle-adjust headset to lengthen the front end for increased stability, or give the bike a more rearward weight bias. Changing the head angle will also impact steering geometry, but we’ll save that for another time.
Taken together, there’s a lot we can do to change how a bike rides. So if there’s one key takeaway point, it’s that you shouldn’t be afraid to experiment with settings, adjusters and riding position. And if those changes don’t bring about the transformation you’re after, offset shock hardware, angle-adjust headsets and alternate wheel sizes certainly will.