 Al Vines shows you how to keep your Hope hubs in tip-top condition, no matter how neglected they’ve been
If you have Hope hubs on your ride, you will already know what fantastic products they are. Being very durable components, Hope hubs can go without servicing for quite some time. However, even the best components need a little love from time to time. The model we’re focusing on is the Hope XC rear, but with different bearings and drifts, the procedure is the same for a Hope Bulb rear hub. While these hubs have been superseded by the Pro 2, spares are still available from Hope, and no doubt will be for a long time to come. As with all Hope hubs, the XC can be stripped down completely and serviced as required. Generally, even the most neglected Hope hub can be serviced to work pretty much as it did from new. The spares needed to service these hubs aren’t expensive. Four good quality 6001 2RS bearings are required and these go for about £4 each. If any other parts are needed they are fairly readily available.
Tool-wise, it is a good idea to invest in proper Hope bearing drifts and a hub support. These will set you back about £20 but make the job much easier. The drifts can be substituted with a correctly sized socket that sits on the outer race of the bearing, but these can cause damage. Instead of the hub support you can use a couple of blocks of wood. However, seeing as you have invested in a quality component it makes sense to use the proper kit.
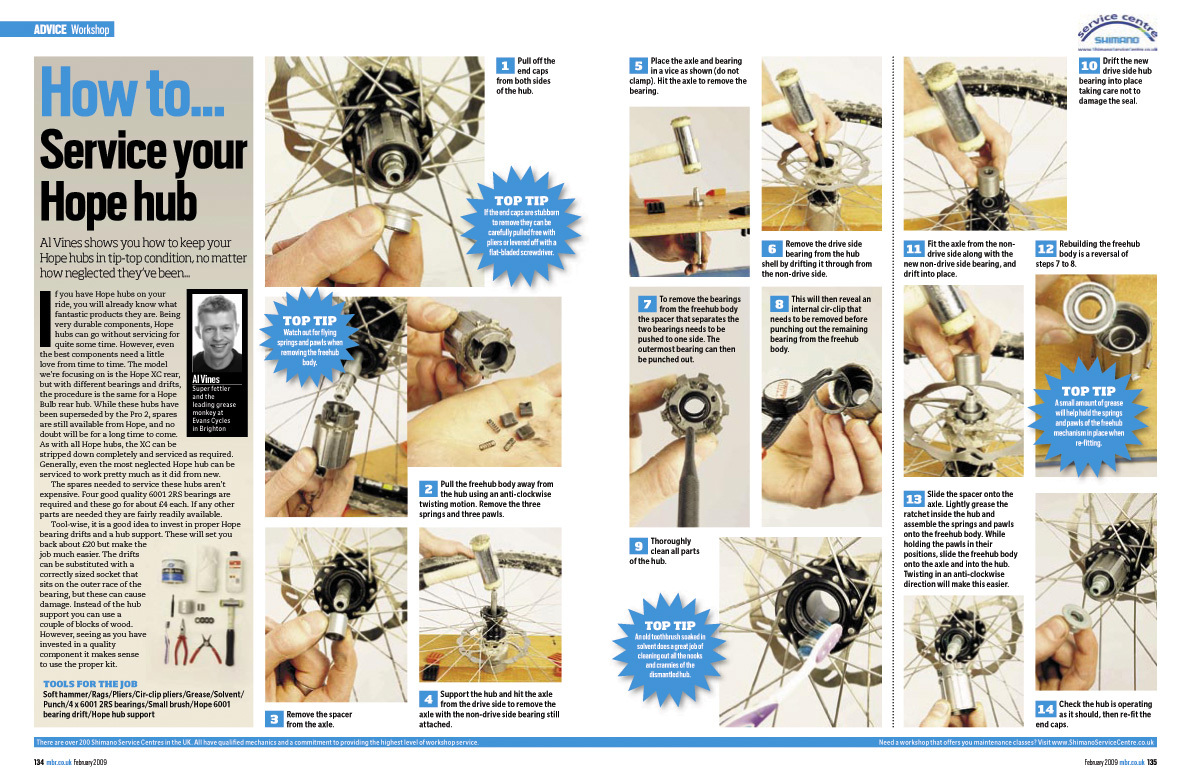
Step 1: Pull off the end caps from both sides of the hub
Step 2: Pull the freehub body away from the hub using an anti-clockwise twisting motion. Remove the three springs and three pawls
Step 3: Remove the spacer from the axle
Step 4: Support the hub and hit the axle from the drive side to remove the axle with the non-drive side bearing still attached
Step 5: Place the axle and bearing in a vice as shown (do not clamp). Hit the axle to remove the bearing
Step 6: Remove the drive side bearing from the hub shell by drifting it through from the non-drive side
Step 7: To remove the bearings from the freehub body the spacer that separates the two bearings needs to be pushed to one side. The outermost bearing can then be punched out
Step 8: This will then reveal an internal cir-clip that needs to be removed before punching out the remaining bearing from the freehub body
Step 9: Thoroughly clean all parts of the hub
Step 10: Drift the new drive side hub bearing into place taking care not to damage the seal
Step 11: Fit the axle from the non-drive side along with the new non-drive side bearing, and drift into place
Step 12: Rebuilding the freehub body is a reversal of steps 7 to 8
Step 13: Slide the spacer onto the axle. Lightly grease the ratchet inside the hub and assemble the springs and pawls onto the freehub body. While holding the pawls in their positions, slide the freehub body onto the axle and into the hub. Twisting in an anti-clockwise direction will make this easier
Step 14: Check the hub is operating as it should, then re-fit the end caps