 Once the sole preserve of hardy perennials, rock gardens have branched out and are now sprouting in trail centres across the land. These intimidating rumps of granite and jagged jigsaws of slate are a true test of commitment for even the most competent rider. But, like many obstacles in the modern trail-builder’s arsenal, they are often easier to ride than they appear.
With any technical section where there are consequences should things go pear-shaped, it’s worth getting off the bike and having a look at the obstacle before you dive in. Look at the run-in: is it straight or do you have to line up for it after a turn? Is it downhill or uphill? Do you need to carry some speed into it, or can you roll in from a standing start? Look at the rock itself. Is it coarse or smooth? Does it have moss or algae growing on it? Put a foot onto the rock and move it around. Use this to gauge how much your tyres will grip. Look at the shape of the rock: what’s the smoothest line? Finally, take a good look at the run-out. Is it rough? Uphill or downhill? Is there a corner you need to get round?
Now check the tyre pressures. The lower the pressure, the better the grip, but you’re going to risk pinch flatting, especially if the rock is jagged like the one in this example. As a rough guide, look at 25-35psi. Assuming it’s a downhill rock garden, it’s worth lowering your saddle a few inches. This will allow you to get further off the back without the risk of snagging gussets and you’ll be able to muscle the bike around a lot more. Lastly, pick a gear that’s going to get you the right entry speed, and be able to put in a quick power stab on the pedals should you get bogged down. Let’s get ready to rumble…

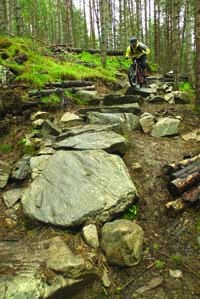
1 As you can see, this is a pretty aggressive line, with a sequence of deep rock steps leading into an angled slab on a slight corner with a fairly flat, straight run-out. There’s only really one line down, but it’s wet, so Andrew’s going to have to be delicate on the brakes. One of the most important things to remember throughout the section is to stay loose. Your body must be able to absorb the impacts. Tense up, and you’ll be fighting the bike and the terrain all the way down. Andrew gets rolling well before entering the section. Don’t try and get clipped in and balanced a metre before the first step. Find a smooth, flat section, 10 to 20 metres further back.

2 There’s plenty of gradient through this section, so Andrew rolls into the first step at walking pace. He’s got both brakes covered by one finger, although you may want to use two. As his front wheel rolls over the edge of the first step, Andrew lets the bike move forward away from him, extending his arms and bending his knees, so that his weight bias moves rearward.

3 As his front wheel drops onto the flat surface of the second step the suspension takes up some of the impact, but Andrew adds his own shock absorption by bending his elbows and knees and letting the bike come up into his chest. His brakes are just scrubbing excess speed, modulating carefully between front and back so that the front wheel doesn’t jam on impact with the rock and pitch him over the bars. With his forks compressed, his head angle steepens, making it even more important to keep the weight back and stay light on the front brake.

4 Both wheels are now on the same rock, and Andrew’s body has fully compressed to absorb the impact. However, he has only a split-second before the front wheel pitches over the next step. It’s important not to stall, because he’ll quickly lose balance on the tight slab. “If you’re going too slow, the wheels are going to get held up in the cracks,” explains Andrew. “Let your bike roll through them.”

5 The flat rock has killed much of his momentum, so he pushes the bar forward to drop the front wheel over the next edge. As his line is on the rider’s right-hand side of the trail, Andrew needs to get lined up for the steep slab just ahead. By moving his left knee out, he begins to initiate the turn. “It’s really important to focus on where you want go,”
he says. “Don’t stare at the rock — focus on the line.”

6 Andrew continues to use his knees and arms to suck up the shocks as the bike stutters down the steps.

7 With the steepest part of the rock garden approaching, and the trail about to bend to the rider’s right, Andrew is reaching the most crucial section of trail. He has to line up on the slab so that he can get a straight exit onto the run-out. He is looking ahead to the next step, aiming to place his front wheel in the slot just to rider’s right.

8 The front wheel just lines up with the V and rolls onto the smoother section of rock. This allows Andrew to use the brakes and bring down his speed ready for the steep slab. He turns the bar to get a straight run down the rock as once committed, he has to lay off the brakes and keep it pointed dead ahead.

9 As gravity takes hold, Andrew stays centred and relaxed on the bike, looking through to the run-out. He rolls down the slab, staying off the brakes, and uses his arms and knees to absorb the transition to flat.
PRO TIPS:
Coach Shandro
Your pilot on this voyage of discovery is none other than former DH pro and freeride legend Andrew Shandro. Originally one of the world’s top DH racers and X-Games gold medallist, Shandro was one of the first downhillers to don a backpack and go freeriding. He quickly made a name for himself as a big mountain specialist and took silver at the Red Bull Rampage in 2003. Since then he has appeared in the seminal films The Collective and Roam, and spends much of his summer teaching kids of all ages how to ‘send it’ at Whistler’s Summer Gravity Camps. www.summergravitycamps.com